Hyderabadi Dum Chicken Biryani – 3 Easy Steps


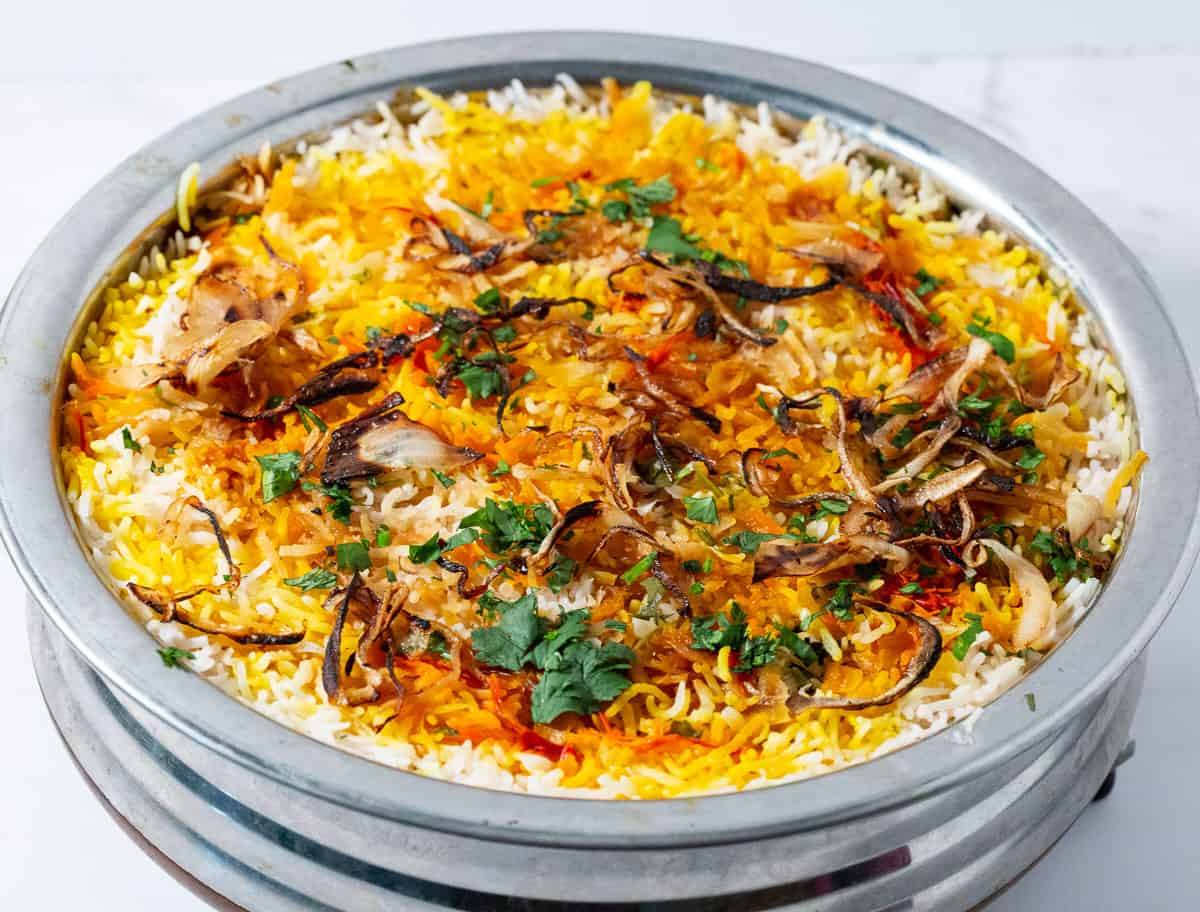
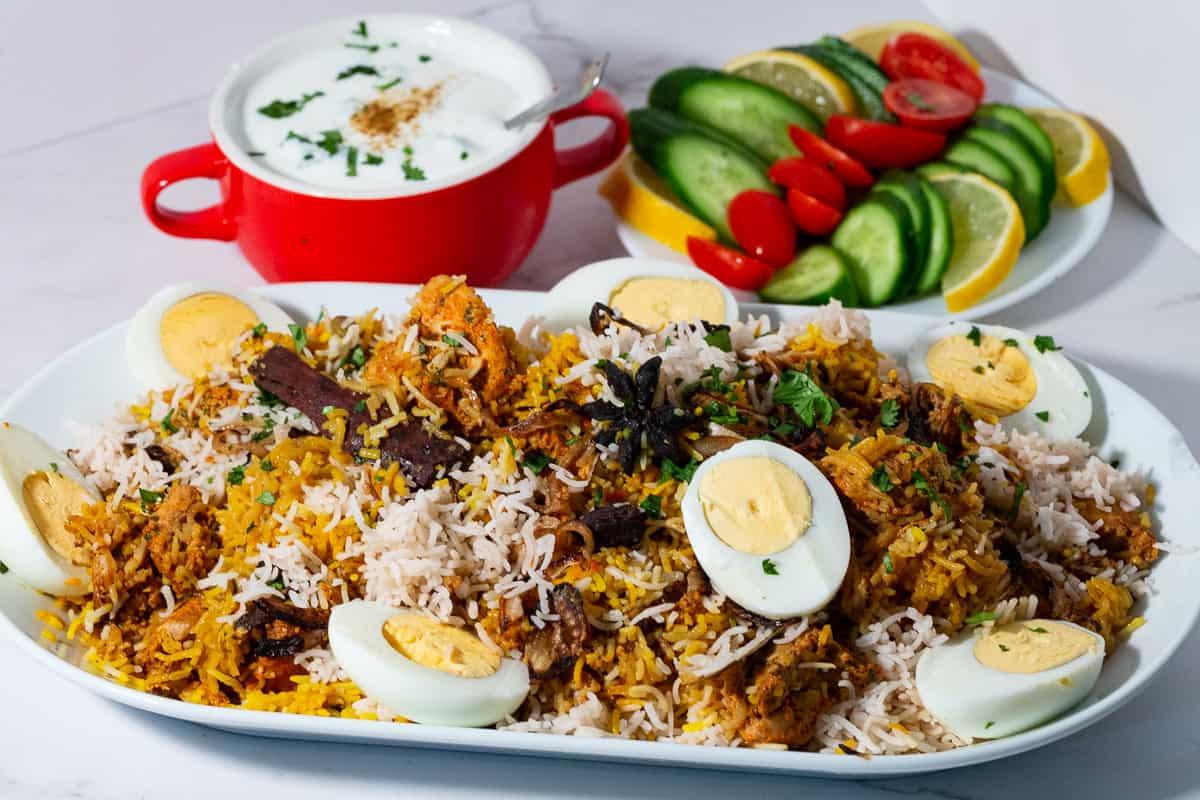
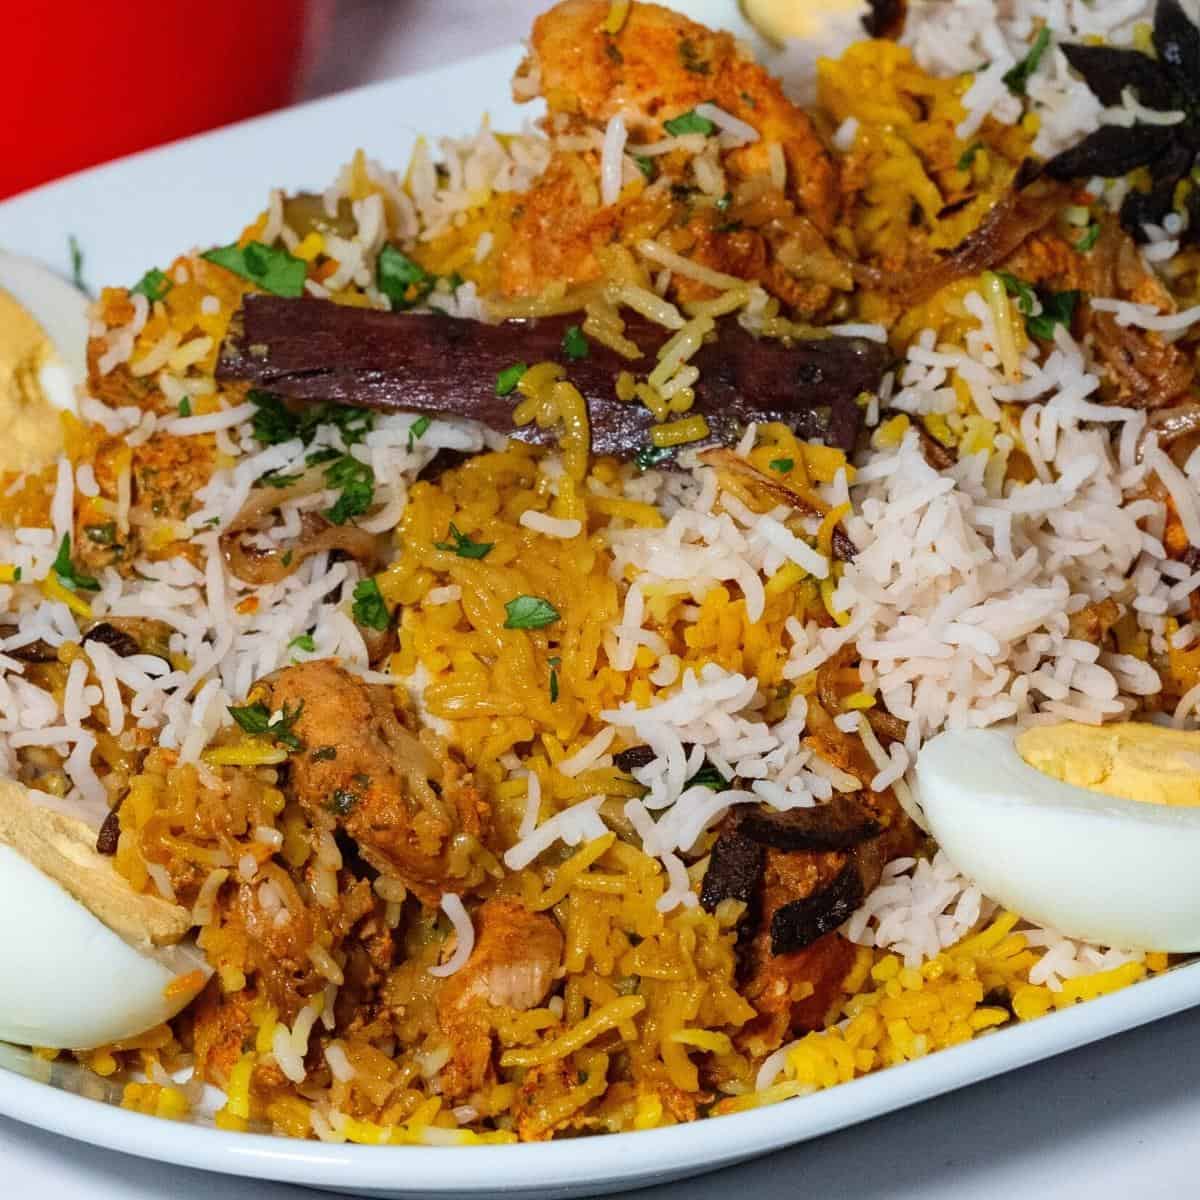
This Hyderabadi Dum chicken biryani recipe, also known as dum biryani, is a traditional dish from Hyderabad, South India, that is popular worldwide. It consists of chicken marinated in spiced yogurt and cooked over aromatic basmati rice, caramelized onions, and saffron for a vibrant, authentic look.
Biryani is a legendary dish that represents the rich tapestry of Indian cuisine. It’s a fragrant, spiced rice dish typically made with basmati rice, meat (such as chicken, beef, lamb, fish, or vegetables), and a blend of aromatic spices.
The term Dum refers to the slow-cooking method in which the pot is tightly sealed (traditionally with dough) to trap the steam inside. This process, known as ‘Dum Pukht,’ allows the ingredients to cook in their own juices, resulting in a tender, flavorful dish where the meat and rice absorb the rich spices and aromas.
The use of the ‘Dum’ method in Hyderabadi Biryani is what gives it its characteristic depth of flavor, making it a dish that is truly special and loved by food enthusiasts around the world.
Why make this biryani?
- Authentic Flavor: This recipe captures the traditional essence of Hyderabadi Dum Biryani by using a precise blend of spices, herbs, and the Dum cooking method, resulting in an aromatic and flavorful dish that’s true to its origins.
- Perfectly Balanced Layers: The careful layering of marinated chicken and partially cooked basmati rice ensures that each bite has a perfect balance of tender meat, fragrant rice, and rich spices, offering a well-rounded and satisfying taste experience.
- Moist and Tender Chicken: The marination process, combined with the slow Dum cooking technique, ensures that the chicken remains moist, tender, and infused with deep flavors, making each piece deliciously succulent.
- Versatility and Customization: The recipe allows for creative variations, making it adaptable to different preferences. You can increase the spice level, add vegetables, or make it vegetarian while still maintaining the dish’s integrity.

Ingredients and substitutes
- Basmati Rice – Of course, biryani calls for Basmati rice because of its elegant long grains. Basmati rice plays a huge part in contributing flavor. Nowadays, you will get basmati rice in all grocery stores. It’s a staple in our home, and I use it for all my rice dishes.
- Chicken – Traditionally, biryani is made with bone-in chicken. I use boneless chicken thighs. Chicken thighs take longer to cook than breasts, and yet, they stay much juicier, too. So, I highly recommend boneless chicken thighs.
- Onions – Fried onions give the biryani that sweet caramelized flavor. I have sautéed red and brown onions until they are almost caramelized to bring out the same flavor while keeping it healthier.
- Ginger, garlic – You must use fresh garlic cloves and fresh ginger. In India, we make a big batch of ginger garlic paste because we use it often, but grated or minced works as long as it is fresh.
- Spice powders – I have given you individual spices used to make biryani, which I think is the best in flavor. It has the perfect balance of red chili powder, coriander, cumin, and a few other spices. Having said that, if you do not have these Indian spices on hand, you can also use 3 tbsps of store-bought biryani masala spice mix.
- Whole spices – We use whole spices to add flavor, but also because you can remove them before eating. Most Indians know that whole cardamom pods, cinnamon sticks, bay leaves, cloves, or peppercorns are not to be eaten. But you can take them out while you are dishing it out, too.
- Saffron – Adds a wonderful, authentic aroma to the dish, but you can also omit it or use edible food colors. The biryani will still be delicious. Read more about colors below.
- Oil, ghee – Biryanis are rich dishes, so you will often get them with lots of oil in the marinade and dollops of ghee or clarified butter on the top. This keeps the rice and meat moist. I have used just 2 tbsp of each to keep it healthier.
- Garam masala – Easily found in most supermarkets, but you can also make your own Garam Masala Spice Mix.

Step-by-step: Hyderabad Dum chicken biryani
Prepare – mise en place
- Sauté Onions – In a saute pan, add 2 tbsp cooking ghee and saute the sliced onions with a pinch of salt until caramelized and golden brown. The onions will take about 10 to 15 minutes. Add half the onions to the marinated meat and use the rest to sprinkle between the layers of rice and the top of the finished biryani.
Alternatively, you can deep fry the onions in oil until they are golden brown. Drain on a paper towel. - Herbs – Chop the herbs and divide them. Add half to the marinated meat and keep the rest to sprinkle between the layers of rice and the top of the finished biryani – and set aside.
- Saffron – Soak the saffron in the milk and let it steep for 10 minutes to 3 hours – set aside. The longer the saffron steeps, the deeper its color.
- Rosewater – Have the rosewater measured and ready to use. And set aside.
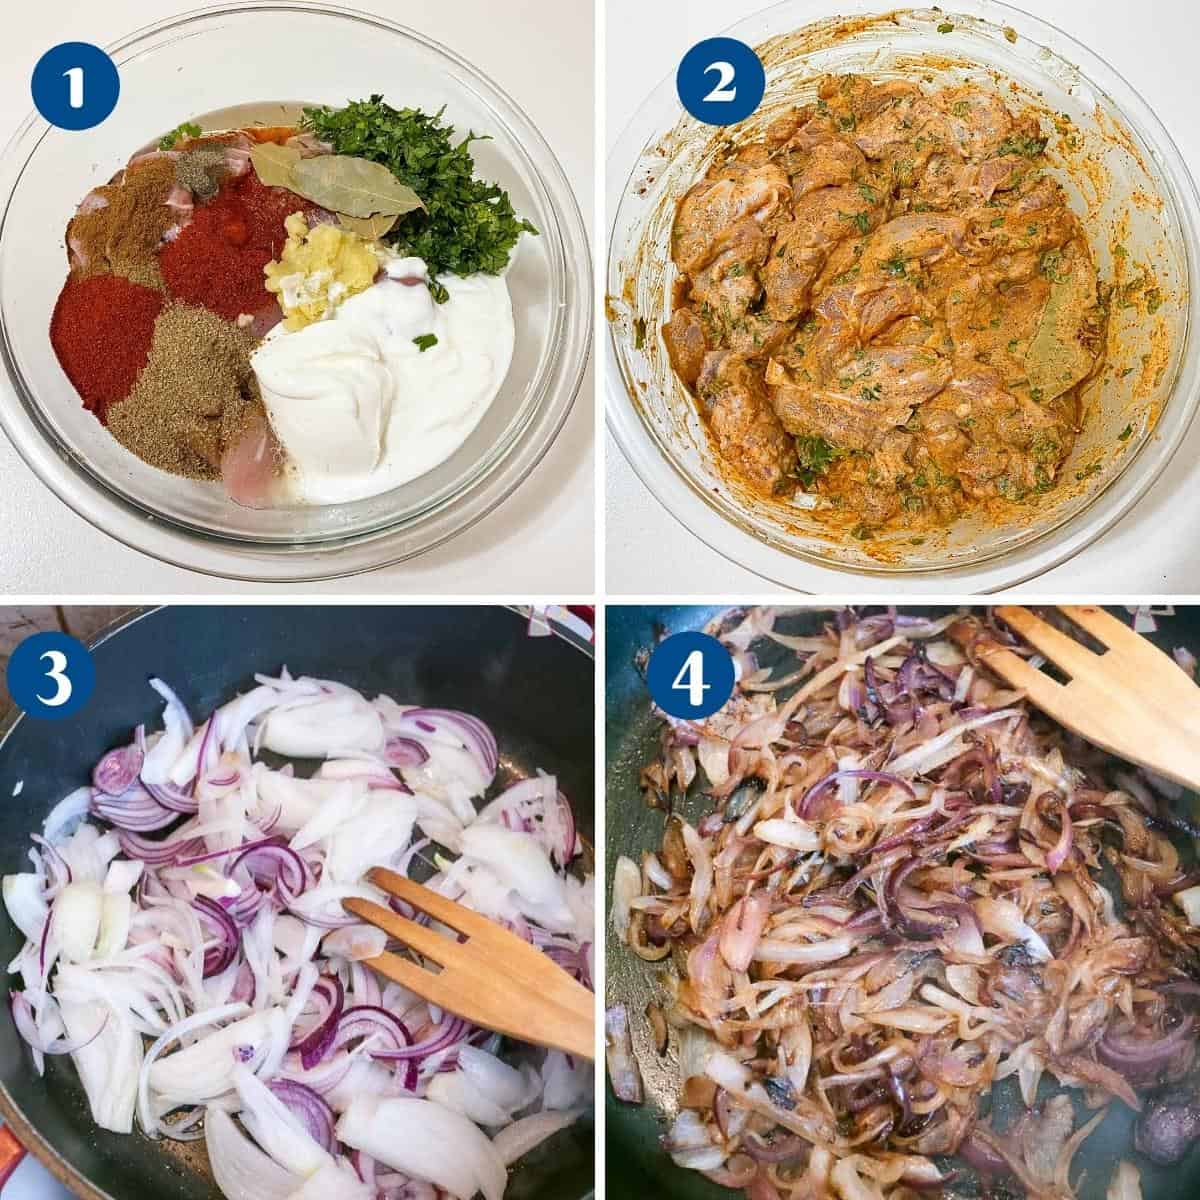
Step One – Marinate Chicken
- In a large marinade-safe bowl, add all the marinade ingredients. Yogurt, ginger, garlic, spices, lemon juice, oil, bay leaves, salt, pepper, etc. Then, add the chicken pieces and combine well. Cover and leave to marinate for an hour on the counter or overnight for up to 12 hours in the fridge.
Pro tip – Always use a marinade-safe bowl, such as glass or plastic, not metal. Metals like aluminum can react with the acid in the recipe, causing it to discolor food and give it a bad taste.

Step Two – Partially cook rice
- Rinse – Measure the rice in a large bowl. Fill with water at least 2 inches more than the rice. Swirl the water around and gently rub the rice with your hand. The water will become very cloudy. Drain the water and repeat the process at least 3 times more or until the water is clear. Drain well.
Pro tip – Rinsing the rice will wash away the starch and reduce stickiness. However, if you purchase pre-washed rice, you can skip the rinsing process. - Soak – Place the rice in a large bowl and fill it with clean water, at least 2 inches more than the rice. Leave to soak for 30 minutes. After 30 minutes, drain the rice and cook it using your preferred method.
- Rice water – Simultaneously, place a large pot of water on the stove and add the spices. Let it simmer for 20 minutes – the color of the water will change because of the spices.
Pro tip– You can tie the spices in cheesecloth before adding them to the pot. That way, you can remove them once the rice is cooked. I prefer to keep them. - Boil – Add the salt, oil, lemon juice, and rice to the water, stir, and let boil. Cook rice for about 3 to 4 minutes until 70% cooked. Drain and set aside.
Pro tip – We want the rice cooked only 70% as it will continue to cook with the steam over the chicken later. I like to drain my rice in a colander lined with cheesecloth.

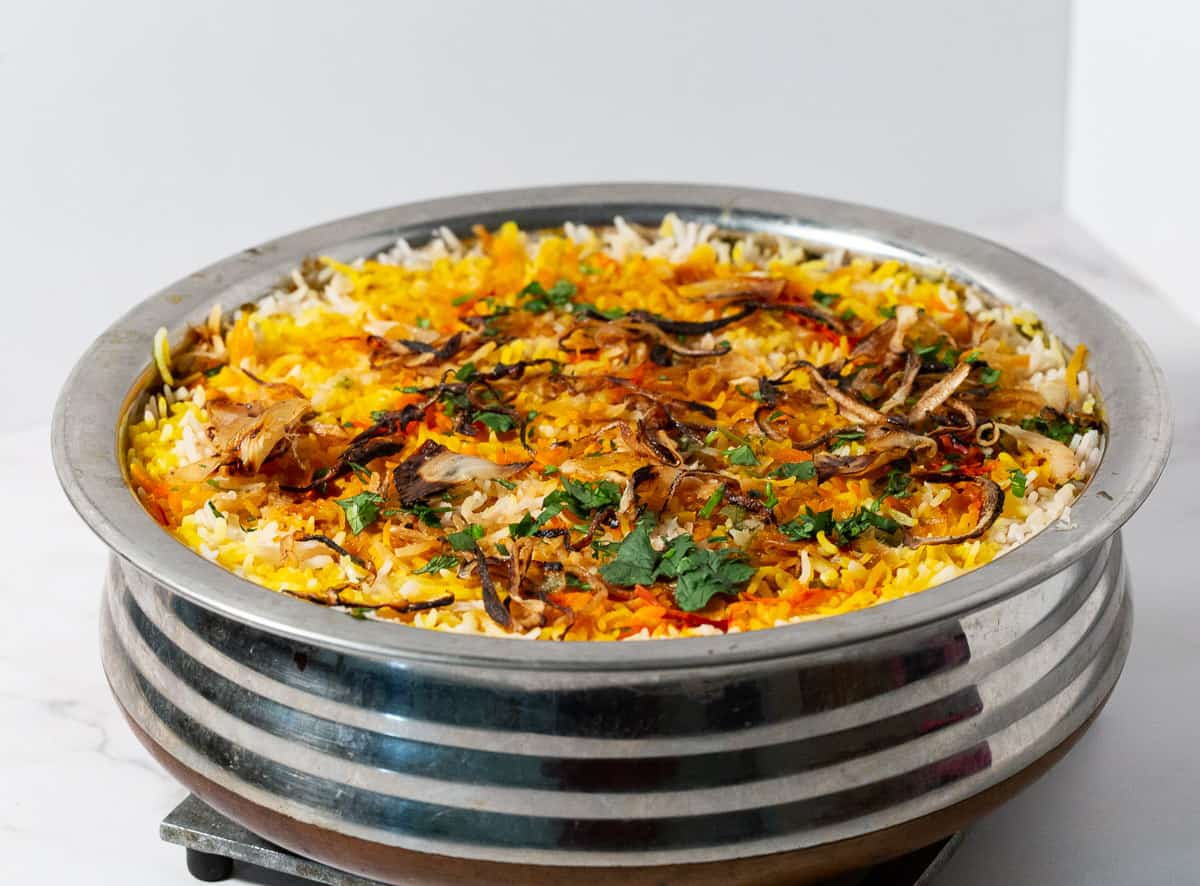
Step Three – Layer and cook the biryani
- To the marinated chicken, add half the chopped herbs, half the caramelized onions, and oil. Then, spread the chicken into a wide, heavy-bottomed pan or Dutch oven in an even layer.
Pro tip – It is important that the meat is all in a single layer touching the bottom of the pan so it cooks evenly. - Next, spread half the rice over the chicken. Sprinkle the remaining herbs and onions over the rice. Drizzle half the saffron milk and rose water. Top with the remaining rice. Sprinkle with remaining saffron milk, ghee, and rose water.
- Seal the pot – Cover the pot with a lid and seal it well. You want all the stems to stay in.
Pro tip – I use two sheets of aluminum foil, one on the rice and the second on the lid. This ensures a good seal, making sure all the dum/steam stays in.

- Cook the chicken Biryani
- 5 minutes on medium-high heat. This will release the chicken juices.
- 10 minutes on medium-low heat. This will ensure the juices cook off without too much gravy
- 15 minutes on low heat. This will ensure the chicken will not burn on the bottom.
Pro tip – If you find that the heat is still not low enough, use a heat diffuser or heat tamper below the pot/skillet.
- When the cooking time is done, don’t open the pot just yet – let the residual heat tenderize the chicken and absorb all the excess moisture for another 15 minutes.
Pro tip – You will know the chicken biryani is cooked by the aroma. Don’t be tempted to open it immediately. This resting time will make sure the steam stays in, giving you a moist, light, fluffy, juicy biryani.
Troubleshooting
- Rice is Too Mushy: The rice was overcooked before layering or cooked for too long during the Dum process. Ensure the rice is only 70% cooked before layering. Use a timer when boiling the rice, and check the texture frequently. During Dum cooking, keep the heat medium-low to prevent overcooking.
- Chicken is Undercooked: The chicken pieces were too large, or the heat was too low during Dum cooking. Cut the chicken into medium-sized pieces to ensure even cooking. If the chicken is undercooked, you can continue to cook the biryani on low heat, but make sure the pot is sealed to prevent moisture loss.
- Burnt Bottom Layer: The heat was too high during the Dum process, or the pot was placed directly on the flame for too long during cooking. Always follow the recipe properly, making sure to cook the biryani according to the suggested heat and temperature. Use a tawa (griddle) underneath the pot to distribute the heat evenly and prevent burning. Avoid opening the lid frequently during cooking.
- Biryani is Too Dry: Insufficient moisture in the marinated chicken or the rice was overcooked during boiling. Ensure the chicken marinade is moist enough, and don’t drain the rice too thoroughly after boiling. Adding a bit more saffron milk or ghee during the layering process can also help.
- Biryani Lacks Flavor: The chicken wasn’t marinated long enough, and the spices were not balanced. Marinate the chicken for at least 2-4 hours, preferably overnight. Taste the marinade before adding the chicken, and adjust the spices as needed. Make sure to use fresh spices for the best flavor.
- Rice is Clumped Together: The rice wasn’t soaked before cooking, or too much water was used during boiling. Soak the basmati rice for at least 30 minutes before cooking to prevent clumping. When boiling, use a large pot with plenty of water, and drain the rice immediately when it’s 70% cooked.
- No Aroma in Biryani: Low-quality or old spices and basmati rice were used, or the pot wasn’t sealed properly during Dum cooking. Use high-quality, fresh spices and basmati rice for a fragrant biryani. Ensure the pot is tightly sealed to trap all the steam and aromas inside during Dum cooking.
- Rice is Sticking to the Pot: Insufficient ghee or oil was used in the layering process, or the heat was too high. Grease the pot lightly with ghee before adding the marinated chicken and rice layers. Use a generous amount of ghee between the layers to prevent sticking. Cook on low heat and use a tawa if necessary.
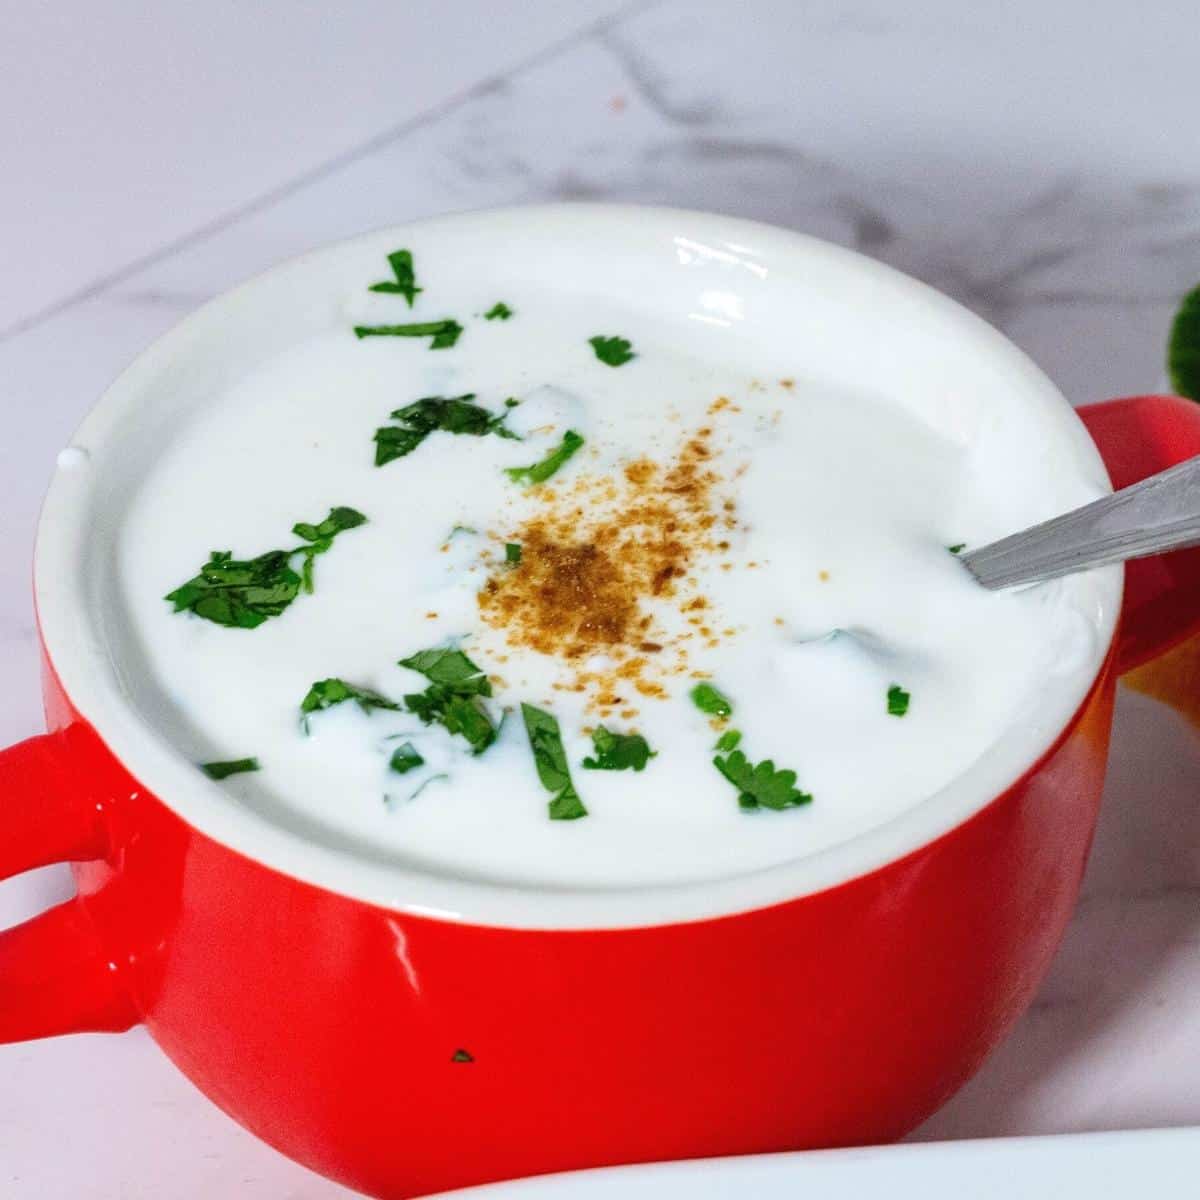
Raita – Yogurt salad with biryani
Biryani is often served with raita, which is flavored yogurt. This is the basic raita, but you can also make this in many variations. For example, add chopped cucumbers, cilantro, or boondi raita made with added deep-fried chickpea flour balls.
- 1 cup yogurt
- 1/2 tsp sugar
- 1/4 tsp pepper
- 1/4 tsp salt
- and 1/4 tsp cumin powder
- Combine all ingredients in a bowl. Taste and adjust seasoning. If the yogurt is not sour, add 1/4 tsp lemon juice.
Serve alongside any rice pilaf or biryani
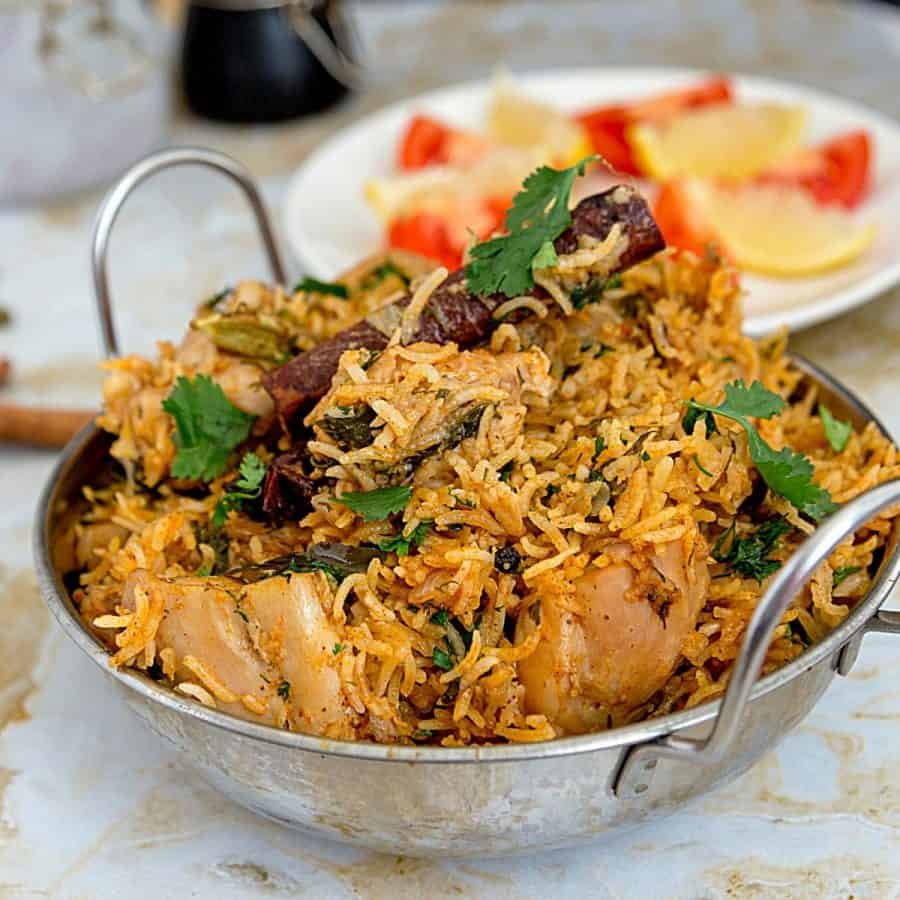
- Lamb Biryani or Mutton Biryani – goat meat biryani
- Instant pot or pressure cooker chicken biryani
- One-pot chicken biryani
- Shrimp rice pilaf biryani, Turmeric Prawn Rice
- Cooked chicken Biryani Recipe – stovetop


Frequently asked questions
The wonderful biryani aroma from the saffron, rose water, and ghee is at its peak when it is freshly made, so if you are entertaining, use that aroma to impress your guests. You can keep the leftovers in the fridge for 4 to 5 days. You can even freeze this chicken biryani in an airtight container for up to a month.
This may sound intimidating, but the next time you visit a restaurant and order biryani, look for these features. A true biryani has a few distinct features.
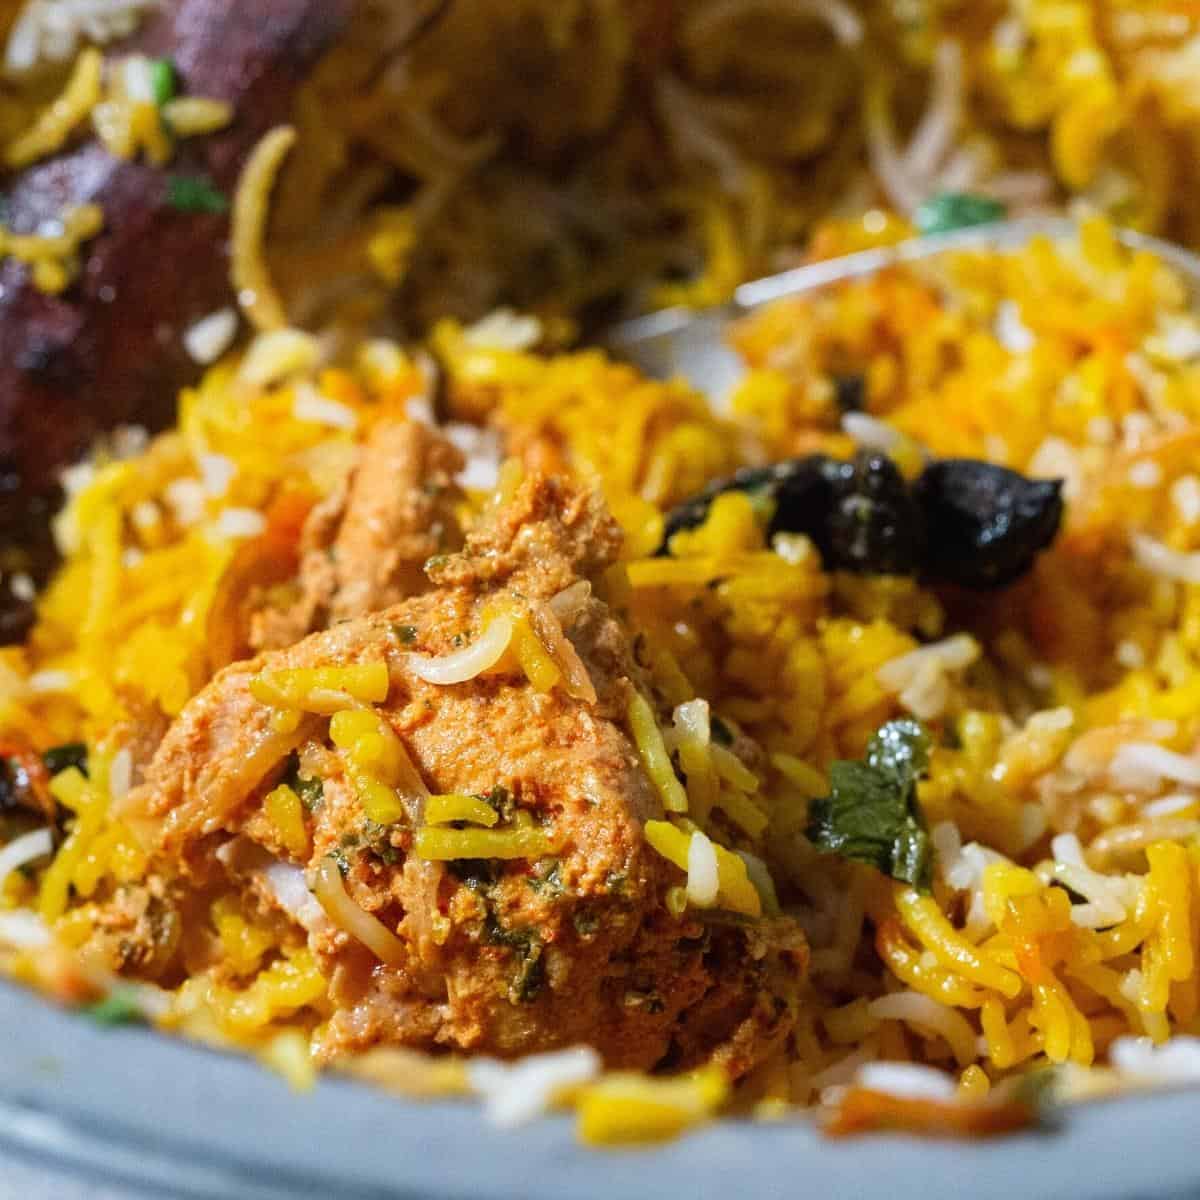
The meat is well marinated and cooked to a fork-tender.
The rice is long-grain and perfectly cooked, so each grain is separate from the other.
The bottom of the pot should not be burnt, nor should there be a pool of gravy! The rice must be moist with the chicken marinade but not soggy.
The colors of saffron shine true from light yellow, golden yellow, orange, and almost red. All these come from steeping the saffron properly.
You can smell the aroma of the biryani miles away – it’s a combination of whole spices, saffron, basmati rice, and ghee. This is what gets those taste buds craving for more…
Now, you don’t need a special Indian pan to make biryani. In fact, you can make biryani in any wide, heavy-bottom pan.
The two most important things to consider when choosing the pan are to make sure it has a wide and heavy bottom. Why?
– Well, wide because you need the meat to be spread out in an even layer so it cooks at the same time and quickly. Since we can’t stir the meat here, any meat on the top will take longer to cook.
– The heavy bottom is to prevent the meat from getting burned at the bottom. Since we initially cook the meat at medium-high heat to encourage it to release its juices, the heavy bottom prevents it from burning.
Cooking the rice right plays a huge part in how good your final biryani will turn out. So here’s a little guide.
– At about 3 minutes into boiling, you will start to check the rice.
– If you press a grain of rice between two fingers, first it will still be hard and break into small pieces -that’s still not there.
– Next, it will be a little softer and crumble into small pieces. This is it
– If it is soft and gets mashed between your fingers, you passed 70%
Drain the rice when it is 70% cooked and set aside.
Authentic biryani gets its color from saffron, which adds not just color but flavor, too. However, some restaurants often use edible food dyes made especially for biryani, which gives it a very vibrant color. And yet, these artificial colors do not contribute any taste or flavor.
Saffron has a distinct flavor and color. However, it is quite expensive and sometimes difficult to find. While it does make a big difference, it is not an absolute must ingredient in a biryani. You can also use artificial food colors or biryani colors if you want.
I serve Biryani with cucumber salad and raita, a flavored yogurt. The yogurt has a cooling effect to help digest all those spices. But you can also serve it with other Indian side dishes like mushroom masala, aloo gobi, Indian Spiced Potatoes, and spiced Indian eggplant. You can find more Indian recipes here on my Indian blog
Video
Ingredients
- 2 cups (400 g) Basmati rice
- 6 Cloves
- 2 Green cardamoms
- 2 Black cardamons
- 3 Bay leaves
- 2 Cinnamon sticks
- 1 Mace (javitri)
- 1 Star anise
- 1 tsp Caraway seeds (Shahi jeera)
- 2 lbs (900 g) Boneless chicken thighs and legs cleaned and cut to bite size pieces
- 1 cup (240 ml) Greek yogurt
- 1 tbsp Ginger grated or paste
- 1 tbsp Garlic minced or paste
- 1 tsp Garam masala powder
- 2 tbsp Coriander powder
- 1 tbsp Cumin powder
- ½ tsp Turmeric powder
- 1 tbsp Chilly powder spicy or mild
- 1 tsp Sweet paprika
- 2 tbsp Cooking oil
- 2 tbsp Lemon juice
- 2 Bay leaves
- 1 tsp Salt
- ½ tsp Black pepper
- 1 tsp Saffron soaked in ¼ cup milk or water (or food colors in milk
- 2 tbsp Rose water up to 4 tbsp for flavor
- 2 – 4 tbsp Ghee enhances flavor
- ½ cup Mint leaves chopped
- 1 cup Cilantro leaves chopped
- 2.5 cups (2.5 cups) Thinly sliced onions deep fried in cooking oil or 1½ cup fried onions
Method
- Saute Onions – In a saute pan add 2 tbsp cooking ghee, saute the sliced onions with a pinch of salt until caramelized and golden brown. The onions will take about 10 to 15 minutes. Add half the onions to the marinated meat and use the rest to sprinkle between the layers of rice and top of the finished biryani. Alternatively, you can deep fry the onions in oil until they are golden brown. Drain on a paper towel.2.5 cups Thinly sliced onions deep fried in cooking oil
- Herbs – Chop the herbs and divide them. Add half to the marinated meat and keep the rest to sprinkle between the layers of rice and top of the finished biryani – set aside
- Saffron –Soak the saffron in milk or water and let it steep for 10 minutes to 3 hours—set aside. The longer the saffron steeps, the deeper the color.1 tsp Saffron soaked in ¼ cup milk or water
- Rosewater – Have the rose water measured and ready to use. Set aside2 tbsp Rose water
- In a large marinade-safe bowl, add all the marinade ingredients – Yogurt, ginger garlic, spices, lemon juice, oil, bay leaves, salt, pepper, etc. Then, add the chicken pieces and combine well. Cover and leave to marinate for an hour on the counter or overnight for up to 12 hours in the fridge. Pro tip: Always use a marinade-safe bowl, such as glass or plastic, not metal. Metals like aluminum can react with the acid in the recipe, discoloring food and giving it a bad taste.2 lbs Boneless chicken thighs and legs, 1 cup Greek yogurt, 1 tbsp Ginger, 1 tbsp Garlic, 1 tsp Garam masala powder, 2 tbsp Coriander powder, 1 tbsp Cumin powder, ½ tsp Turmeric powder, 1 tbsp Chilly powder, 1 tsp Sweet paprika, 2 tbsp Cooking oil , 2 tbsp Lemon juice, 2 Bay leaves, 1 tsp Salt, ½ tsp Black pepper
- Rinse – Measure the rice in a large bowl. Fill with water at least 2 inches more than the rice. Swirl the water around and gently rub the rice with your hand. The water will become very cloudy. Drain the water and repeat the process at least 3 times more or until the water is clear. Drain well. Pro tip – Rinsing the rice will wash away the starch and reduce stickiness. However, if you purchase pre-washed rice you can skip the rising process.2 cups Basmati rice, 6 Cloves, 2 Green cardamoms, 2 Black cardamons, 3 Bay leaves, 2 Cinnamon sticks, 1 Mace, 1 Star anise, 1 tsp Caraway seeds
- Soak – Place the rice in a large bowl and fill it with clean water, at least about 2 inches more than the rice. Leave to soak for 30 minutes. After 30 minutes, drain the rice and cook using your preferred method.
- Rice water – Simultaneously, place a large pot of water on the stove and add the spices. Let it simmer for 20 minutes – the color of the water will change because of the spices. Pro tip– You can tie the spices in cheesecloth before adding them to the pot. That way you can remove them once the rice is cooked. I prefer to keep them.
- Boil – To the water, add the salt, oil, lemon juice, and rice, stir and let boil. Cook rice for about 3 to 4 minutes until 70% cooked. Drain and set aside.Pro tip – We want the rice cooked only 70% as it will continue to cook with the steam over the chicken later. I like to drain my rice in a colander lined with cheesecloth.
- Add half the chopped herbs, caramelized onions, and ghee to the marinated chicken. Then, spread the chicken into an even layer in a wide, heavy-bottom pan or Dutch oven.Pro tip: The meat should be in a single layer, touching the bottom of the pan, so it cooks evenly.
- Next spread half the rice over the chicken. Sprinkle the remaining herbs and onions over the rice. Drizzle half the saffron milk and rose water. Top with the remaining rice. Sprinkle with remaining saffron milk, ghee, and rose water.1 cup Cilantro leaves, ½ cup Mint leaves, 2 – 4 tbsp Ghee
- Seal the pot – Cover the pot with a lid make sure it is sealed well. You want all the stem to stay in. Pro tip – I use two sheets of aluminum foil one on the rice and the second over the lid. This ensures a good seal making sure all the dum/steam stays in.
- Cook the chicken Biryani– 5 minutes on medium-high heat. This will get the chicken juices released – 10 minutes on medium-low heat. This will ensure the juices cook off without too much gravy – 15 minutes on low heat. This will ensure the chicken will not burn on the bottom.Pro tip– if you find that the heat is still not low enough, use a heat diffuser or heat tamper below the pot/skillet.
- When the cooking time is done. Don't open the pot just yet – let the residue heat tenderize the chicken and absorb all the excess moisture for another 15 minutes Pro tip – by the aroma, you will know the chicken biryani is cooked. Don't be tempted to open it immediately. This resting time will make sure the steam stays in giving you a moist light and fluffy juicy biryani.
Notes
- Choose Quality Basmati Rice: Use long-grain basmati rice for the best texture and aroma. Soak the rice for at least 30 minutes to help it cook evenly and achieve a fluffy, separate grain structure.
- Marinate for the Right Amount of Time: Allow the chicken to marinate for at least 2-4 hours, but overnight is best. This gives the chicken time to absorb all the spices, resulting in a deeply flavorful dish.
- Monitor the Rice Cooking: Cook the rice until it’s just 70% done. The grains should be slightly firm, as they will continue to cook during the Dum process. Overcooking the rice at this stage can lead to a mushy biryani.
- Seal the Pot Tightly: When cooking on Dum, seal the pot tightly to trap the steam inside. This steam is crucial for cooking the chicken and rice evenly and blending the flavors perfectly. If your lid isn’t tight enough, use a dough seal around the edge of the pot.
- Cook on Low Heat: The Dum process requires slow, even cooking on various heats. Place the pot on a tawa (griddle) to avoid direct heat that could burn the bottom layer. This method ensures the flavors meld together beautifully without overcooking any part.
- Rest the Biryani: After turning off the heat, let the biryani rest for 10 minutes before opening the lid. This resting period allows the steam to settle, making it easier to fluff the rice without breaking the grains.
- Don’t Skip the Fried Onions: Fried onions add sweetness and depth to the biryani. You can either make them at home or use store-bought ones, but they’re essential for the authentic taste.
- Use Fresh Herbs: Fresh coriander and mint leaves add a burst of freshness and are integral to the dish’s flavor profile. Add them generously in the layering process.
- Adjust Spice Levels to Taste: Taste the marinade before adding the chicken and adjust the spices to your liking. This ensures the final dish is perfectly suited to your palate.
- Serve with Accompaniments: Biryani is best served with cooling raita, a side salad, and boiled eggs or papad for a complete and satisfying meal.
Raita – Yogurt salad with biryani
Biryani is often served with raita, which is flavored yogurt. This is the basic raita, but you can make it in many variations. For example, you can add chopped cucumbers and cilantro or make boondi raita with deep-fried chickpea flour balls.- 1 cup yogurt
- 1/2 tsp sugar
- 1/4 tsp pepper
- 1/4 tsp salt
- and 1/4 tsp cumin powder
- Combine all ingredients in a bowl. Taste and adjust seasoning. If the yogurt is not sour add 1/4 tsp lemon juice.
Serve alongside any rice pilaf or biryani
Equipment you will need


Nutrition
Tried this recipe?
Mention @veenaazmanov_kitchen or tag #veenaazmanovkitchen!


Don’t lose this recipe! Save it for Later!
📌 Save this Recipe for later on Pinterest so you can easily find it again.
⭐ Add Veena Azmanov Kitchen to your Google Preferred Sources.
It helps Google show you more of our recipes.
📧 Subscribe for new recipes delivered to your inbox.
🎥 Follow us for more recipes


Thank you for sharing this incredible recipe! I’ve been immersing myself in North Indian and Lebanese cuisine for the past year, and this post has inspired me to try new dishes. The richness of spices truly adds a magical touch to every recipe. Can’t wait to explore more and enhance my culinary skills!
Hi Veena, I’m looking to make this for a crowd so I will need to multiple it several times. Do you have any suggestions on things to look out for if I make a larger quantity? And I’m wondering about cooking it in a oven. Any thoughts?
Thanks for your help!
Becky
Hey Becky, I suggest making a Dum biryani (raw meat) on the stovetop as it is supposed to be. If you want to make it in the oven, use the Biryani, which uses meat cooked ahead of time. This way, you will be sure it is cooked to perfection.
We loved it!! Made it for our Indian family visiting Canada. Was very afraid to try but your instructions were spot on. Love the pro tips. You made it simple easy and so authentic. I’m new at cooking so thank you so much.
You are very welcome Sohali. Lucky family. Thanks for the lovely feedback.