How do I blind bake a crust
Blind baking a pie crust ensures a crisp, fully cooked base, preventing sogginess from wet fillings. This essential technique involves baking the crust partially or fully before adding the filling. Follow these simple steps to achieve a perfectly golden, flaky crust every time.

A pie crust is a pastry dough that forms the base and sometimes the top of a pie. It is typically made from flour, fat (such as butter or shortening), and water. The main goal is to create a tender, flaky texture that provides structure and complements the filling. The main ingredients of a pie dough are:
- Flour: Provides the structure for the crust.
- Fat (Butter or Shortening): Adds flavor and creates a flaky texture by forming layers within the dough.
- Water: Helps bind the ingredients together and provides moisture.
- Salt: Enhances the overall flavor of the crust.
- Sugar (Optional): Adds a touch of sweetness, especially useful for dessert pies.
Blind baking is a technique where the pie crust is baked partially or fully without the filling. This method ensures that the crust is fully cooked and remains crisp. This is especially important for pies with fillings that are not baked or have a short baking time.
What is the purpose of Blind Baking?
- Prevent Sogginess: Ensures the crust stays crisp and does not become soggy from the filling’s moisture.
- Ensure Crispness: Creates a firm and crisp crust that can hold up against wet or creamy fillings.
- Maintain Shape: Prevents the crust from puffing up or shrinking during baking, ensuring it retains the shape of the pie dish.
- Partial or Full Baking: Depending on the recipe, you might blind-bake the crust partially (for pies that will bake again with the filling) or fully (for pies with no-bake fillings).

Step-by-step: How to blind bake a pie crust
Choose the Right Pie Dough
- Use a Sturdy Dough: Choose a pie dough recipe that holds up well to baking. Pie crust or shortcrust pastry is a good choice for blind baking.
- Chill the Dough: After making the dough, chill it in the refrigerator for at least 30 minutes. This helps the gluten relax and prevents shrinking during baking.
Roll Out the Dough
- Roll Evenly: Roll the dough out on a lightly floured surface to an even thickness, usually about 1/8 inch. Ensure it is large enough to cover the pie dish with some overhang.
- Transfer Carefully: Transfer the rolled dough to your pie dish by rolling it around your rolling pin and unrolling it over the dish. Gently press the dough into the dish without stretching it.

Trim and Chill
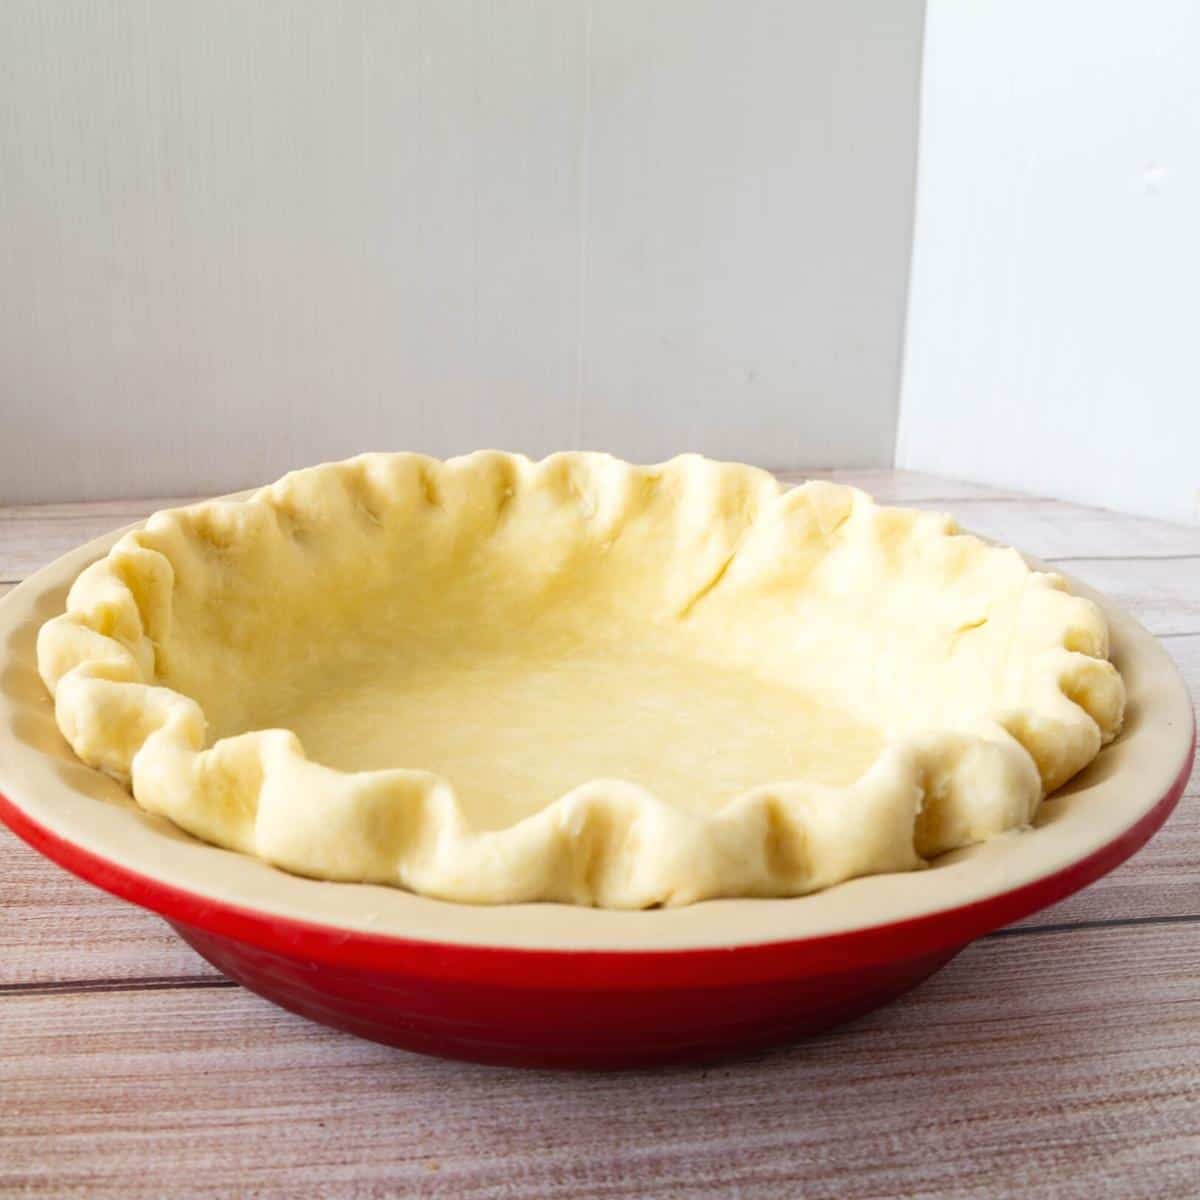
- Trim Excess Dough: Trim the excess dough, leaving about a 1/2 inch overhang. Fold the overhang under itself to create a thicker edge.
- Crimp the Edges: Use your fingers or a fork to crimp the edges of the pie crust for a decorative finish.
- Chill Again: Chill the pie crust in the refrigerator for at least 30 minutes or in the freezer for 15 minutes. This step is crucial to prevent the crust from shrinking.

Prick the Base
- Dock the Dough: Use a fork to prick the base and sides of the crust. This helps steam escape and prevents the crust from puffing up.
Line with Parchment and Weights
- Add Parchment Paper: Line the chilled crust with parchment paper or aluminum foil, ensuring it covers the edges.
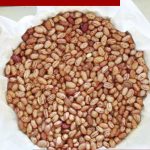
- Use Pie Weights: Fill the lined crust with pie weights, dried beans, or uncooked rice. These weights keep the crust from bubbling up and maintain its shape.
Bake the Crust
- Preheat the Oven: Preheat your oven to 375°F (190°C).
- Bake with Weights: Bake the crust for 15-20 minutes with the weights in place.
- Remove the Weights: Carefully remove the parchment paper and weights. If the edges are browning too quickly, cover them with foil or a pie shield.

Finish Baking
- Bake Until Golden: Return the crust to the oven without the filling and bake for 10-15 minutes or until the base is golden brown and thoroughly baked. Alternatively, add the filling and continue to bake until the filling is cooked or as suggested in your recipe.
- Cool Completely: Let the crust cool completely before adding your filling for fully baked shells.

Tips for Perfect Blind Baking
- Use Fresh, High-Quality Ingredients: Ensure your butter is cold to create a flaky texture. Use ice-cold water to help bind the dough without warming the fat.
- Chill the Dough: Chill the dough after making it and before rolling it out. This relaxes the gluten and prevents shrinking. Once the dough is in the pie dish, chill it again before baking. This helps the crust maintain its shape.
- Properly Roll and Transfer the Dough: Roll the dough to an even thickness of about 1/8 inch to ensure uniform baking. Use your rolling pin to transfer the dough to the pie dish without stretching it, which can cause shrinkage.
- Dock the Dough: Use a fork to prick the base and sides of the dough. This allows steam to escape and prevents the crust from puffing up.
- Use Parchment Paper and Weight: Line the chilled crust with parchment paper or aluminum foil, ensuring it covers the edges. Fill the lined crust with pie weights, dried beans, or uncooked rice to keep the dough from bubbling.
- Bake in Two Stages: Pre-bake the crust with weights for about 15-20 minutes at 375°F (190°C). Carefully remove the parchment and weights, then bake for an additional 10-15 minutes until the crust is golden brown.
- Monitor the Edges: If the edges start to brown too quickly, cover them with foil or a pie shield to prevent burning.
- Ensure Even Browning: Rotate the pie dish halfway through baking to ensure even browning.
- Cool Before Filling: Let the crust cool completely before adding the filling to prevent it from becoming soggy.
- Extra Tips for Perfection: For extra crispness, brush the baked crust with a beaten egg white and bake for another 2 minutes. This creates a moisture barrier.
- Use Pie Weights for Even Baking: Make sure the weights are evenly distributed to avoid uneven baking.
- Prevent Over-Browning: If the edges of the pie brown too fast during the second bake, cover them with pie shields or foil.
- Adjust Baking Time: Different ovens can vary, so keep an eye on the crust and adjust the baking time to achieve a perfect golden brown.
Types that can be used for blind baking
- Pie Crust Pastry: This classic pie crust is made from flour, fat (butter or shortening), and water. It’s known for its flaky and tender texture, perfect for both sweet and savory pies.
- Sweet Shortcrust Pastry/Pâte Sucrée: This crust is similar to shortcrust pastry but includes sugar, making it sweet. It’s commonly used for tarts and dessert pies, providing a firm yet tender base that complements sweet fillings.
- Rich Shortcrust Pastry/Pâte Sablée: This rich, crumbly crust contains more butter and sometimes egg yolks, giving it a sandy texture. It’s often used for delicate tart bases and pairs well with creamy or fruit fillings.
- Graham Cracker Crust/Crushed Graham Crackers: This crust is made by mixing crushed graham crackers with melted butter and sugar. It is commonly used for cheesecakes and no-bake pies, offering a sweet and crunchy texture.


Frequently asked questions
No, you don’t. All you need is a bowl and your fingertips. Having said that, my favorite equipment when making any pastry is the food processor. I like to cut the butter into the flour until it reaches a fine breadcrumb consistency. And I find the food processor gives an even distribution of butter in the flour, making a very stable dough that’s easy to roll without very large chunks of butter. Also, it takes less than 30 seconds to pulse the whole thing. This helps keep everything cold and keeps it working quickly.
If you added too much water, just add a tablespoon or two of flour and bring it all together. If the dough is soft and sticky, which usually appears wet, it means the dough is probably too warmed up. Shape it into a ball and wrap it in cling wrap. Chill it until it is firm enough to roll.
If the dough is too hard to roll, it means it is too chilled. Let it thaw for a few minutes on the counter so it’s pliable enough to roll. If you try to roll when it’s hard, it will crack too much. You want your dough chilled yet still easy enough to roll.
It’s best to chill the pastry before you bake it. That ensures the butter stays cold. When baked, the butter melts into the dough, making a beautiful flaky crust. If the dough is not cold, it tends to shrink.
A pre-baked pie crust needs to bake for 20 minutes with pie weight (baking beans), then without weight for another 10 minutes.
Sometimes, when the pie filling is too liquid, it can soak into the bottom crust, making it soggy. One way to avoid this is to brush the bottom pre-baked pie crust with egg whites. This essentially creates a seal between the crust and the filling.
If you live in a hot and humid climate – place the flour and salt in a bowl and keep the bowl in the fridge for about an hour. This will keep the ingredients cold. Avoid touching the dough too much with your warm hands. Also, flip the dough over the rolling pin when possible. Work on the back of a chilled baking tray rather than a countertop. And chill the tray in the fridge when you let it rest. That way, the dough and tray will stay cold at all times.
A good guide is a 3:2:1 part ratio, which means 3 parts of flour, 2 parts of fat, and 1 part of water. With that basic formula, you can make a couple of pies simultaneously. It has helped me many times because I sometimes bake six pies all at once.
Shortening is 100% fat, while butter is 80% fat. So yes, shortening gives you the flakiest crust. On the other hand, butter has so much more flavor. Therefore, butter is usually my choice of fat for pastry. You can use all butter, shortening, or lard, or try 50% butter and 50% shortening. See which you prefer.
You can use coconut oil instead of butter or shortening for the pie dough. Coconut oil will need to be solidified in the fridge before you cut it into the flour, just like butter. I prefer the combination of half coconut oil and half butter.
When blind baking a crust, we use baking beans or pie weights. The weights work as a mock filling, which can be removed once the crust is partially baked. The filling is then added, and the pie goes back into the oven for further cooking.
If you do not use any pie weight, the sides of the pie crust can collapse into the center, and the bottom of the crust may puff up. If the sides fall in, you won’t be able to keep the filling in the middle, and it won’t look good when you slice the pie. Also, it means you have less space for pie filling.
Don’t lose this recipe! Save it for Later!
📌 Save this Recipe for later on Pinterest so you can easily find it again.
⭐ Add Veena Azmanov Kitchen to your Google Preferred Sources.
It helps Google show you more of our recipes.
📧 Subscribe for new recipes delivered to your inbox.
🎥 Follow us for more recipes


Thank you for all the tips! I hardly ever make homemade pie but will now start after you made baking the crust look so easy!!
Such a great tutorial on blind baking! I usually do this whenever I bake savory pies like turkey pot pie!
These tips and tricks were perfect! I am always so afraid to bake a pie, and this walked me through it so well 🙂
This crust looks perfect! Baked to golden perfection and thick edges which I love. Beautiful tips and tricks, Veena!
I feel a little silly, but I have never used pie weights. I think that’s the trick to getting this to turn out so well! Thanks for the recommendations!
What a great tutorial, it covers all the bases for those who want to bale pies successfully.
This helped my pie bake up really nicely without getting soggy! Your instructions were clear and it was so easy!
Perfect timing for this very informative post! I’m about to make a few pies with local fruit and I am using your recipe to pre bake the crusts! So far, so good!
Thank you for this detailed instruction about blind baking a pie crust. Very useful information, and bookmarked!
My crust turned juuuust perrfect. Great recipe and instructions. My new favorite! Thank you. ?