Honey Pistachio Baklava
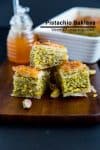

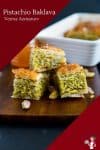
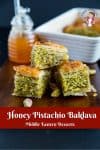
Baklava is a popular Middle Eastern dessert. It’s made with thin, crisp layers of buttered filo sheets filled with a sweet pistachio mixture. The baklava is baked crisp, then soaked in a sugar syrup that just melts in the mouth. This simple and easy recipe for honey pistachio baklava makes the most delicious baklava you will ever taste.

If you know Middle Eastern food, then you know baklava. And, if you have eaten enough baklava, then you can pick a good baklava just by looking at it. These days, everybody makes baklava in many different variations. And while I like the variations and choices, what bothers me is that not everyone understands the true characteristics of a baklava.
So, what is good baklava?
It’s not just layers of filo soaked in sugar syrup. Nor is it supposed to be dripping syrup when you eat it. In fact, a slice of good baklava can be held between your fingers without any sugar syrup dripping. And when you bite into it, you should feel the crispy filo layers melt in the mouth.
You get the right texture and consistency by making sure you have just the right amounts and balance. For example, the right amount of butter makes those layers crispy. But too much butter will soak in, making them soggy. Also, you want just enough sugar syrup to soak those layers and disappear. Too much sugar syrup will end up at the bottom of the pan, making the bottom layers soggy and creating an unnecessarily sweet dessert.
Now that I have told you what good baklava is, how about I give you my perfect honey pistachio baklava recipe? I really wanted to make a video, but things didn’t work out as planned this time. So, I will make a video, but at a later date, whenever possible.

Ingredients and substitutes
- Filo—I always use store-bought filo, but you are free to experiment with fresh filo. Fresh filo is a bit harder to work with when layering, but it’s still possible.
- Pistachio – These are expensive, I know! But they do taste delicious, especially in baklava. For a more affordable alternative, you can use half cashews, almonds, walnuts, or a combination of them.
- Sugar and honey—Sugar gives the syrup a nice consistency and flavor compared to honey. However, you can also use only honey. Honey makes a very heavy syrup. I like reducing the sugar by half the honey to balance the sweetness.
- Lemon – Helps cut down the sweetness, so do not omit it. And no, it won’t make it lemony.
- Zest—This is optional, but I think it adds that lemon zing, which always helps to balance out the flavors.
- Butter – Makes the layers crisp when baked, which prevents the sugar syrup from making them soggy. Makes sense?
- Rosewater—Now, note that this is not the same as a rose extract. Rose extract is concentrated, so you need only a drop or two.
If you don’t have rose water, it’s okay. You can omit it completely or use a drop of rose extract for flavoring. - Cinnamon – Adds a hint of flavor without overpowering. I hate it when I bite into baklava; all I get is the taste of cinnamon. This is not cinnamon baklava, so the cinnamon flavor should barely exist.
Step-by-step instructions
Prepare
- Make sure the filo pastry is thawed – keep it wrapped to prevent drying out.
- Preheat the oven to 170 °C / 340 °F.
- Melt butter and cool to room temperature.
Make syrup
- In a saucepan, combine sugar, honey, lemon juice, lemon zest, cinnamon stick, rose water, and water.
- Boil on medium-low until sugar is dissolved.
- Once all the sugar is dissolved, let it simmer on low for 5 minutes.
- Then, sieve through a strainer to remove zest and cinnamon stick.
- Set aside to cool completely.
Make the nut mixture
- Pulse the pistachio nuts in a food processor.
- Remove some while still coarse and pulse the remaining some more for a finer consistency. This will add a nice texture and taste.
- Next, add sugar and combine well. Set aside.
Assembly
- Use an 8 x 10 rectangular pan or a 10 x 10-inch square pan.
- Lightly brush with melted butter.
- Cut the stack of filo into 4. Now, you have 12 filo sheets. Measure the filo to your pan and cut off any excess.
- Place the first sheet of filo in the pan.
- Lightly brush with melted butter.
- Continue to add five sheets, lightly brushing with melted butter.
- Then, sprinkle 1/4 of the pistachio mixture.
- Now, add three layers of filo and lightly brush each with melted butter.
- Followed by another 1/4 of the pistachio mixture.
- Continue layering three filo and pistachio until you have used up all the pistachio mixture.
- Finally, add the last five layers of filo for the top.
- So you should have:
- 5 filo sheets + nuts then
- 3 filo sheets + nuts, then3 filo sheets + nuts again
- 3 filo sheets + nuts and final
- 5 filo sheets. (This doesn’t have to be exact)
- Brush the last and top of the filo with any remaining melted butter—this will give it a nice golden top.
Score and bake
- Using a sharp knife, cut the layers into squares.
- I prefer to cut a line in the middle in both directions and then cut more on either side of those lines.
- Place the baklava in the preheated oven and bake until golden, for about 30 minutes.
Syrup and cool
- Once the baklava has been baked, let it cool in the pan for 5 minutes.
- Then, pour the prepared, cooled sugar/honey syrup evenly over the top.
- This will soak into the layers while the baklava is cooling.
Storage
- This baklava will stay at room temperature for up to a week.
- I don’t like to keep it in the fridge as the butter cools, making it dry.
- You can freeze baklava for up to a month. Then, thaw it in the fridge overnight and on the countertop before you serve it.
Don’t lose this recipe! Save it for Later!
📌 Save this Recipe for later on Pinterest so you can easily find it again.
⭐ Add Veena Azmanov Kitchen to your Google Preferred Sources.
It helps Google show you more of our recipes.
📧 Subscribe for new recipes delivered to your inbox.
🎥 Follow us for more recipes

Honey Pistachio Baklava
Baklava is a popular Middle Eastern dessert with thin crisp layers of buttered filo sheets layered with a sweet pistachio mixture, baked crisp, then soaked in sugar syrup that just melts in the mouth. This simple, easy, and effortless recipe for honey pistachio baklava makes the most decadent baklava you will ever taste.
Method
- Make sure the filo pastry is thawed – keep wrapped to prevent drying out.
- Preheat the oven to 170 °C / 340°F
- Melt butter and cool to room temperature.
- In a saucepan, combine sugar, honey, lemon juice, lemon zest, cinnamon stick, rose water, and water.
- Boil on medium-low until sugar is dissolved.
- Once all the sugar is dissolved, let it simmer on low for 5 minutes.
- Sieve through a strainer to remove zest and cinnamon stick.
- Set aside to cool completely.
- Pulse the pistachio nuts in a food processor.
- Remove some while still coarse and pulse the remaining some more for a finer consistency. This will add a nice texture and taste.
- Add sugar and combine well. Set aside
- Use an 8 x 10 rectangular pan or a 10 x 10-inch square pan.
- Lightly brush with melted butter.
- Cut the stack of filo into 4. Now you have 12 filo sheets. Measure the filo to your pan and cut off any excess.
- Place the first sheet of filo in the pan.
- Lightly brush with melted butter.
- Continue to add five sheets, lightly brushing with melted butter.
- Sprinkle 1/4 of the pistachio mixture.
- Now add three layers of filo, lightly brush each with melted butter.
- Followed by another 1/4 of the pistachio mixture.
- Continue layering three filo and pistachio, until you have used up all the pistachio mixture.
- Finally, add the last five layers of filo for the top.
- So you should have 5 filo sheets + nuts then 3 filo sheets + nuts, then 3 filo sheets + nuts again 3 filo sheets + nuts and final 5 filo sheets. (This doesn't have to be exact.)
- Brush the last and top of the filo with any remaining melted butter – this will give a nice golden top.
- Using a sharp knife, cut the layers into squares.
- I prefer to cut a line in the middle in both directions and then cut more on either side of those lines.
- Place the baklava in the oven and bake until golden, for about 30 minutes.
- Once the baklava has been baked, let it cool in the pan for 5 minutes.
- Then, pour the prepared, cooled sugar/honey syrup evenly over the top.
- This will soak into the layers while the baklava is cooling.
- This baklava will stay at room temperature for up to a week.
- I don't like to keep it in the fridge as the butter cools, making it dry.
- You can freeze baklava for up to a month. Thaw in the fridge overnight, then on the countertop before you serve.
Notes
Tips for making a good Baklava (Save/Pin)
- Have you ever had a piece of baklava where the layers are all falling apart? It’s good but also messy. I notice if you spread the mixture more between fewer layers, it holds better.
- How many layers – the truth is, there is no need to follow an exact number. You can add more or fewer layers as long as you keep a good amount of mixture. Too much mixture in between layers will again make those squares fall apart. I have given you a guide of 5 layers followed by 3 layers, but you can do more or less.
- Pan sizes – Use any pan you have at home. It does not have to be the same pan mentioned in the recipe post. Ideally, you want to find a plan that will minimize filo waste. So, see the size of your filo and choose a pan such that you can cut the filo into two, three, or four pieces. I get large sheets of filo which I have to cut into four to get an 8 x 10 pan. Again, use your better judgment of size.
- Buttering the layers – I know we say to brush the layers with butter, but brushing can sometimes cause the layers to tear, so just drizzling a little butter in between layers works too. And if you are not so keen on using too much butter, a butter-flavored oil spray works too! Yes, it does!
- Cutting the layers – It is important to cut the baklava before it goes into the oven because cutting the crisp layers later will break apart. I prefer to cut the layers first, then before serving, I run my knife one more time between the layers to ensure I have them all separated.


Day 20 DONE
Pastry day 20-Done
Pastry Day 20 DONE
I’m a bit confused with the recipe and instructions. Is the recipe (pastry and syrup) multiplied by 4 to account for the 4 layers you talk about in the instructions? I really want to try out this recipe so please let me know ASAP
No Khat. the recipe if for the layers. No need to multiply. Thanks
Made this last week.. OMG!! Was so good. The sweetness was just right and the syrup was just right too. Perfect. Thanks
Thank you, Juan. So happy to hear you had success with this recipe and you enjoyed it so much. Thanks for coming back to write this feedback. Have a lovely day.
OMG made these a few weeks ago and it was a big hit. So made it yesterday again.. doubled the recipe. I’M IN LOVE. everything is just right.. sweet, nuts and crisp. Thanks
Thank you, Cookie. So happy to hear you had success with this recipe and enjoyed it so much. Thanks for coming back to write this feedback. Have a lovely day.
I love making baklava at home and it is one of our favorite dessert. I love your pistachio Baklava. What a great color that gives to the baklava. Working with filo is a little hard, but once we get a hang of it, it gets easier. I am so tempted to eat a couple right now.
Mine too Sandhya. I love baklava too! Filo can be a bit hard but as you say once you get the hang of it – its’ fun with so many possibilities.
Your Pistachio Baklava looks so tempting. I often see this dessert on Pinterest, I guess its about time to tackle this. Yum! Yum!
Thank you, Calleigh. I hope you try this baklava. It’s super easy.
Baklava is my favorite, you made perfect and beautiful one,expensive too. I am not making at home because I will finish the entire sheet pan. So controlling myself. Yours is so tempting, so next time when you make parcel me some.
Yes it is kinda expensive overseas. A bit more affordable here in the middle east. I love making my own every time. Once you get a hang of it it becomes super easy.
I love your take on this classic with pistachios! Such a fantastic idea, Veena! The layers are just so beautiful…gorgeous dessert dear. xo
Thank you Catherine. I do love pistachio baklava.