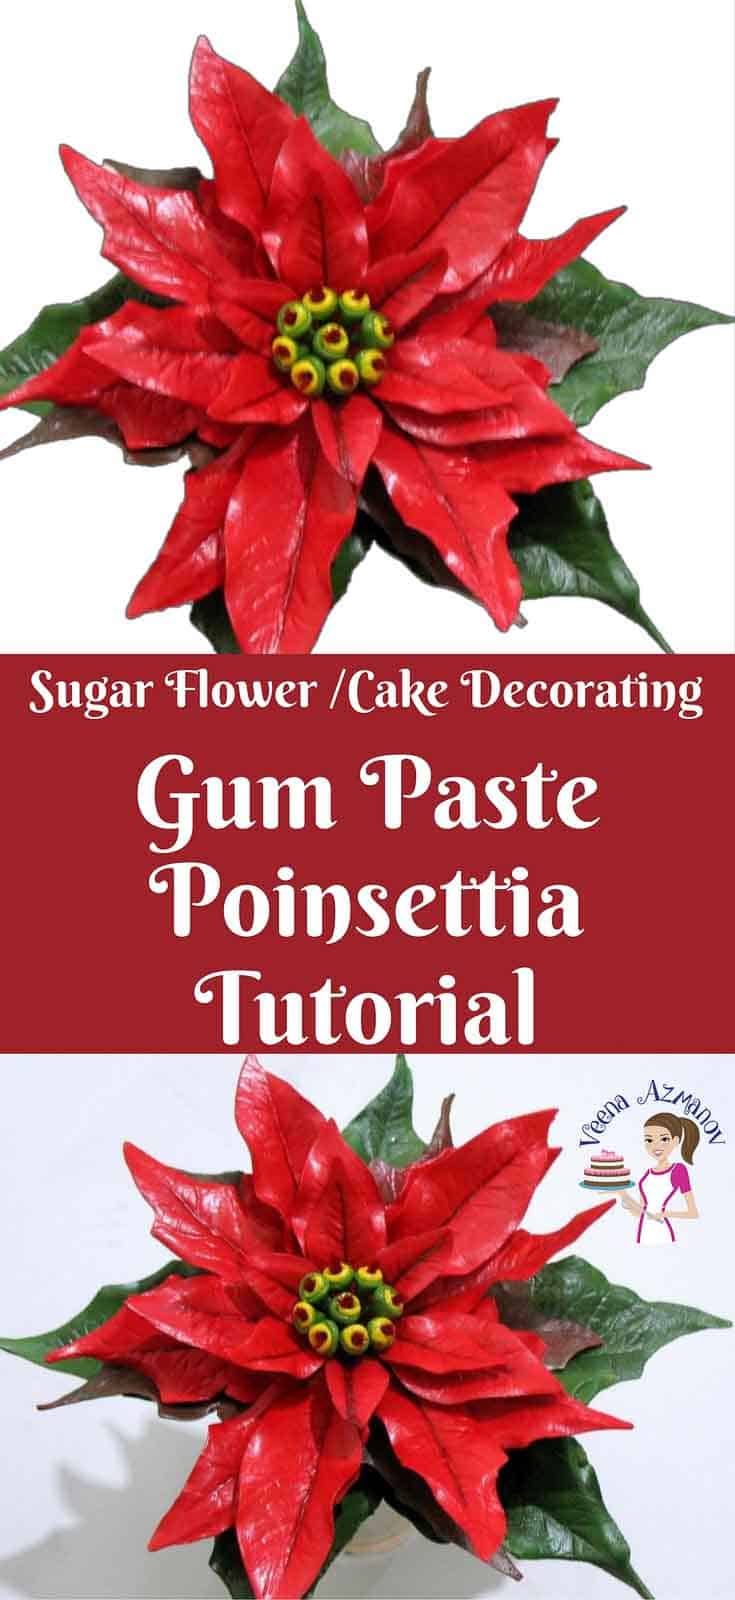
Gum Paste Poinsettia Tutorial
The gum paste poinsettia is a very impressive Christmas flower and can be made in many different colors, from white and pink to a deep red such as this. Whatever color you make, the method and process are the same as shared here in these detailed step-by-step progress pictures.
Well, Christmas is soon approaching, and of course, every Christmas, I make these beautiful Gum Paste Poinsettias, which are always the highlight of my Christmas. I absolutely love them.
Poinsettias are also called the Lobster flower and the flame-leaf flower due to their red color. There are more than 100 varieties of Poinsettias available. These come in colors like the traditional red, white, pink, burgundy, marbled, and speckled. The showy colored parts, which people think of as the flower petals, are actually colored bracts or modified leaves. For the purpose of this tutorial, I shall often refer to them as petals.
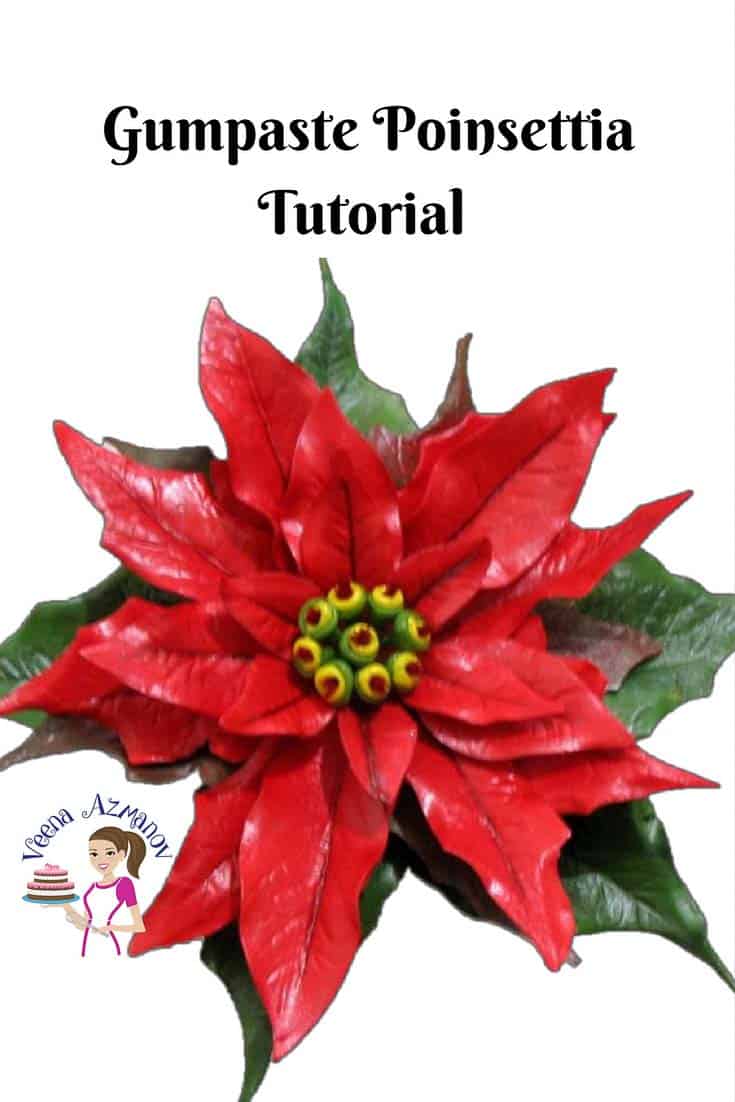
Here’s a close-up of the gum paste Poinsettia
For this tutorial, I have used Global Sugar Art Poinsettia cutters. This is a medium to large and has about 32 petals. Below, I have given you the variations on how to make the medium or small. This is a detailed tutorial that involves many different steps. The first time on any flowers is usually time-consuming, but once you get the hang of it, you really start to enjoy the process and learn ways to add your own spin on it
Sugar Flower Basic – Common to all sugar flowers
- Sugar flowers must be made with gumpaste, not fondant or fondant with CMC or fifty/fifty.
- Edible Glue works best for flowers – Take 1 tsp of CMC or Tylose Powder, and add about 4 tbsp. of water. Set aside for a few minutes. The mixtures will thicken. Add a few more drops of water to bring to the desired consistency.
- Florist wires – the higher the gauge, the more delicate or thinner the wire. Gauge 30 is more delicate than gauge 18; while gauge 18 is necessary for heavy flowers like roses, gauges 28 and 30 work best for light filler flowers.
- Thin the edges – This is done by placing the ball tool half on the white soft board and half on the petal and then rubbing the ball tool across the edges of the bract. Place on the foam pad to dry.
- Steaming the finished sugar flowers – This is done by holding the flower over the steam of boiling water. Do not hold too close to the steam or for too long, as the petals will melt. Each flower takes a few seconds to steam.
Tutorial – How to make gumpaste poinsettia
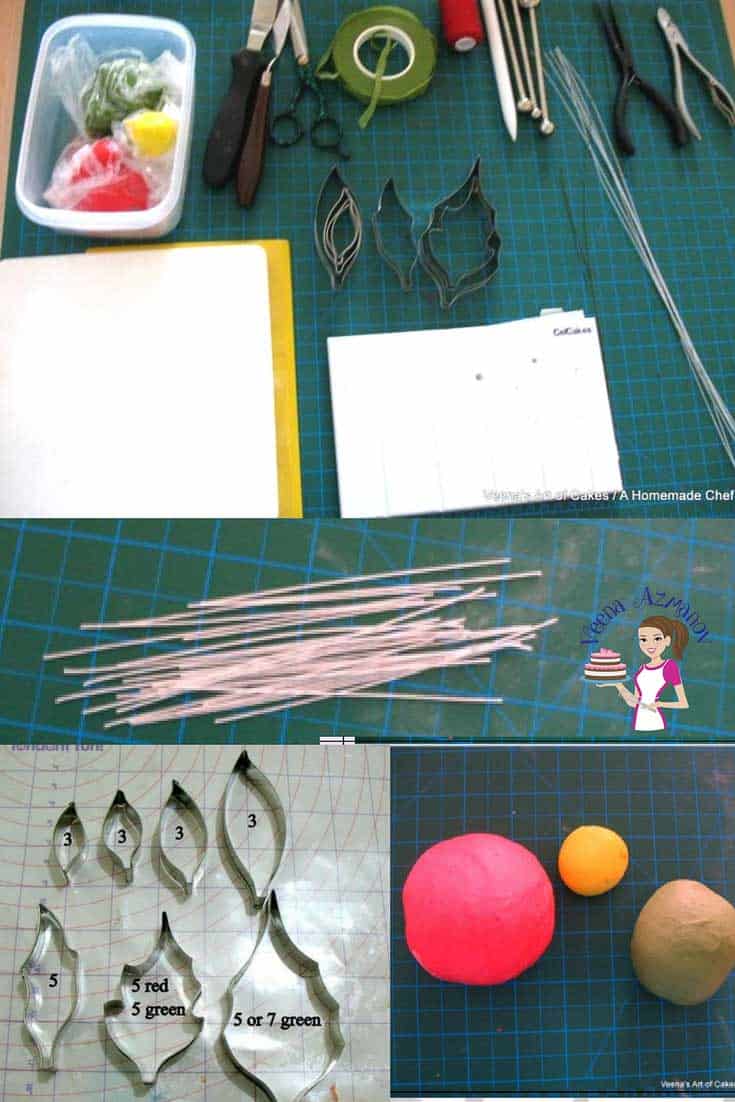
Tools – Things you will need
- Flower Paste/gum paste –homemade recipe or commercial
- Gum paste rolling pin
- Gumpaste foam pad
- Poinsettia cutter
- Poinsettia veiners or multipurpose leaf veiner
- Red sewing thread & scissors
- Needle-nose pliers
- Pliers to cut wires
- Ball tool or bone tool
- 26-gauge green florist wires for the centers
- 22 gauge white florist wires
- 22-gauge green florist wires
- Moss green florist stem tape
- Edible glue
- Gum paste dusting powders – red, aubergine, maroon, green
- And brushes
Edible Glue I use for my flowers – Take 1 tsp of CMC or Tylose Powder, and add about 4 tbsp. of water. Set aside for a few minutes. The mixtures will thicken. Add a few more drops of water to the desired consistency.
For this tutorial, I am using the Global Sugar Art Poinsettia Cutters, but the cutters by other makers will also work exactly the same way. Here are the number of Bracts/petals and leaves we will make for this project. And nine centers.
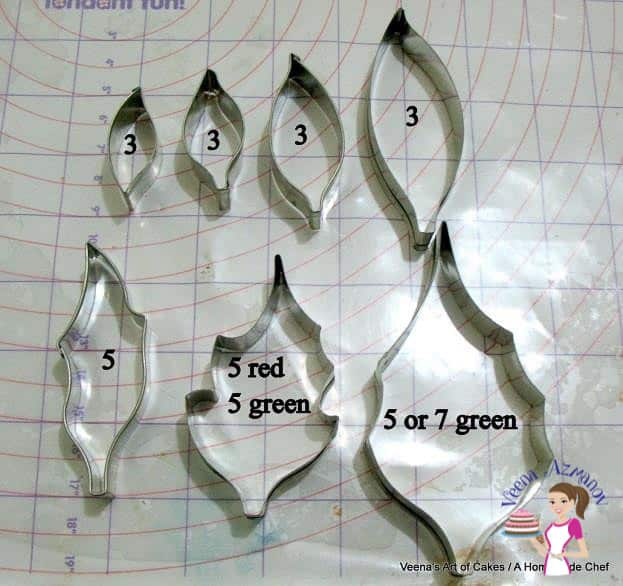
Number of bracts & leaves to make a different Gumpaste Poinsettia
Flower Size – Number of Centers and No of bracts/ leaves.
- Small – 7 centers with about 20 to 22 bracts & leaves.
- Medium – 9 centers with about 30 to 32 bracts & leaves.
- Large – 11 centers, about 40 to 42 bracts & leaves.
Wires
- 26 g green wire for the centers.
- 22 g white wire for the bracts/ petals and leaves.
- For the centers, I cut each wire into four.
- For the bracts/petals, I cut each wire into three.
Color your gumpaste
- I usually color my paste a lighter shade of the color I need.
- In this case, it’s a lighter shade of red and green.
- I’m using – Extra Red Gel Color by Magic Colors.
- Garden green with a drop of moss green.
- And some yellow for the centers.
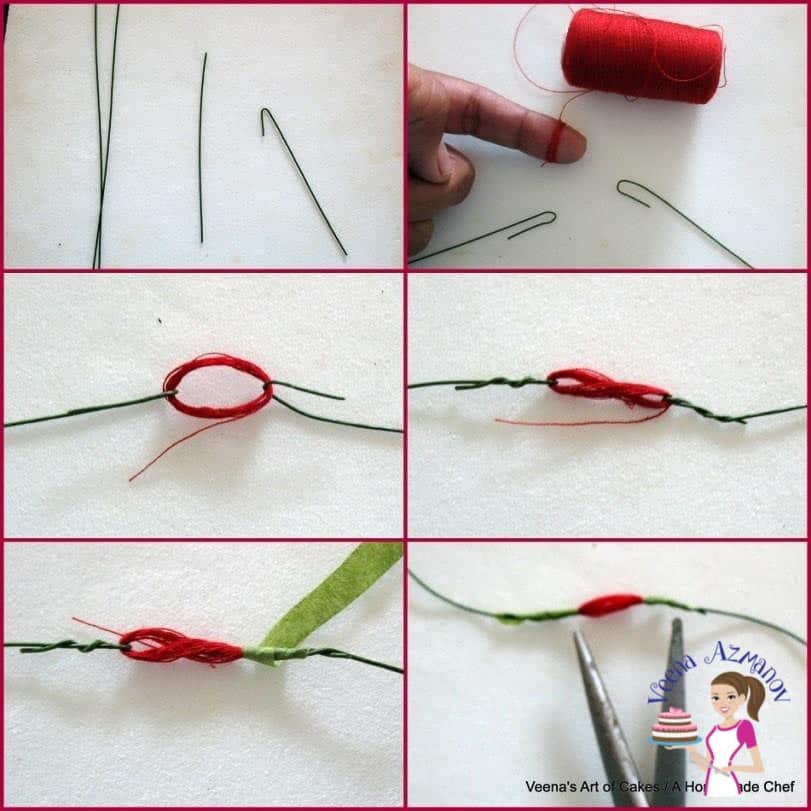
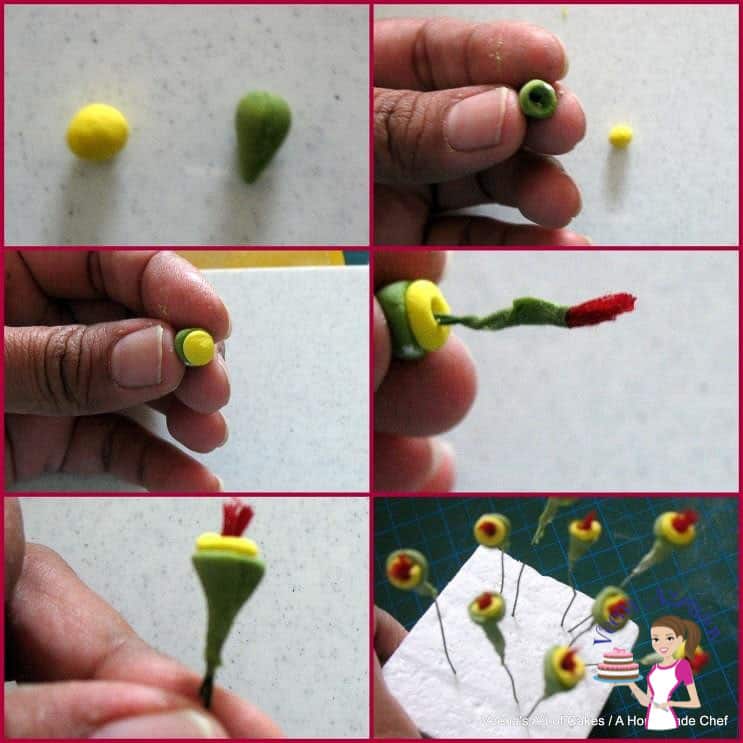
Preparing the centers for the gumpaste poinsettia
- Take each wire, cut it in half, then cut it in half again. So you will need nine centers for a medium-sized poinsettia.
- Make a large open hook at the end of each wire, as shown.
- Take red sewing thread and wrap it 15 times around your finger.
- Carefully take it off your finger.
- Wrap two wire hooks as shown. Twist the ends close to secure.
- Wrap the twisted end of the wire with green florist tape to secure it.
- Cut the thread in between so you have two centers.
- Make nine of these centers and set them aside.
- Take each center dip in edible glue.
- Dab off any excess with a paper towel.
- Set aside to dry.
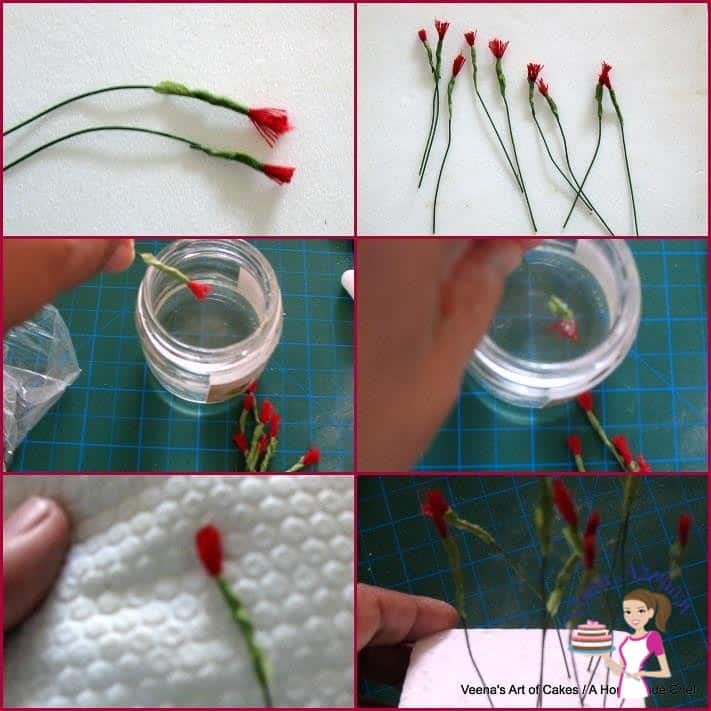
- Take a small pea-sized ball of moss-green paste.
- And about half a pea-sized ball of yellow paste.
- Roll both into a teardrop shape.
- Using the cell stick or the back of a paintbrush, make a hole in the green paste as shown.
- Place the yellow teardrop into the green.
- Make a hole in the center of the yellow.
- Thread the prepared center through the hole.
- Cut off any excess from the bottom. Leave to dry.
- Dust the green with some green petal dust once dry.
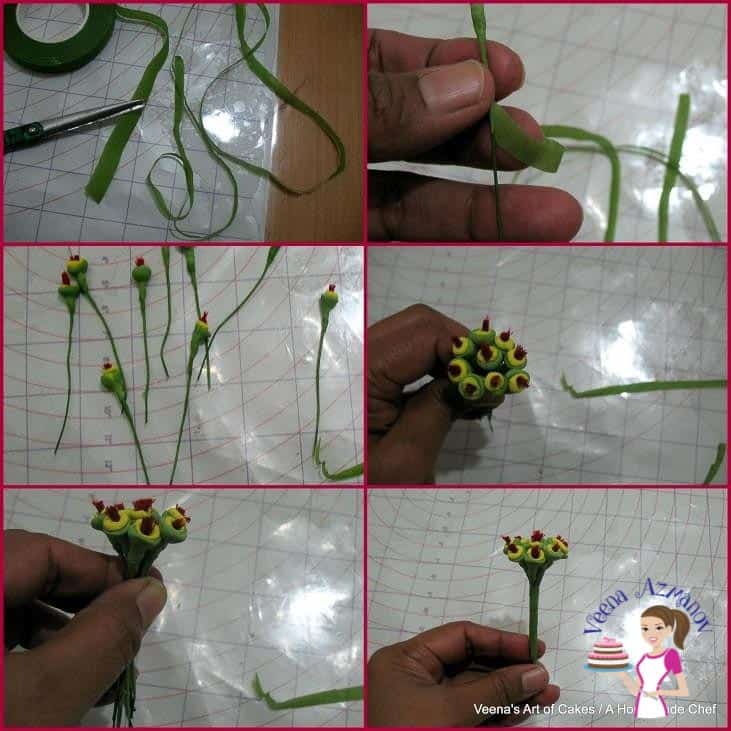
Wrapping the centers together
- Cut your green florist tape lengthwise into two.
- Wrap each center stem with the green florist tape.
- Arrange all the centers as best you can. I have put them in a cluster, but you can separate them with lots of space between them.
- Poinsettia centers are just tight clusters that are not really arranged well, so you do not need to make them the same as mine.
- Wrap them all together with the florist tape and set aside.
- Trim off any excess or uneven red threads.
- Dust the green with a little more green petal dust.
Next, we move on to making the Bracts or Petals
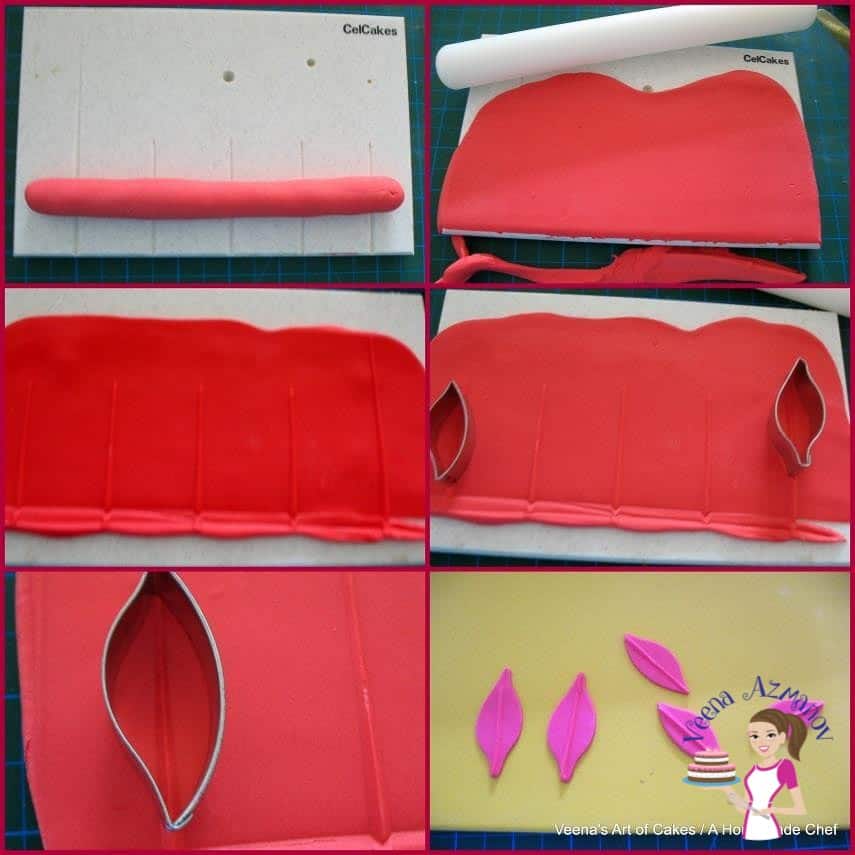
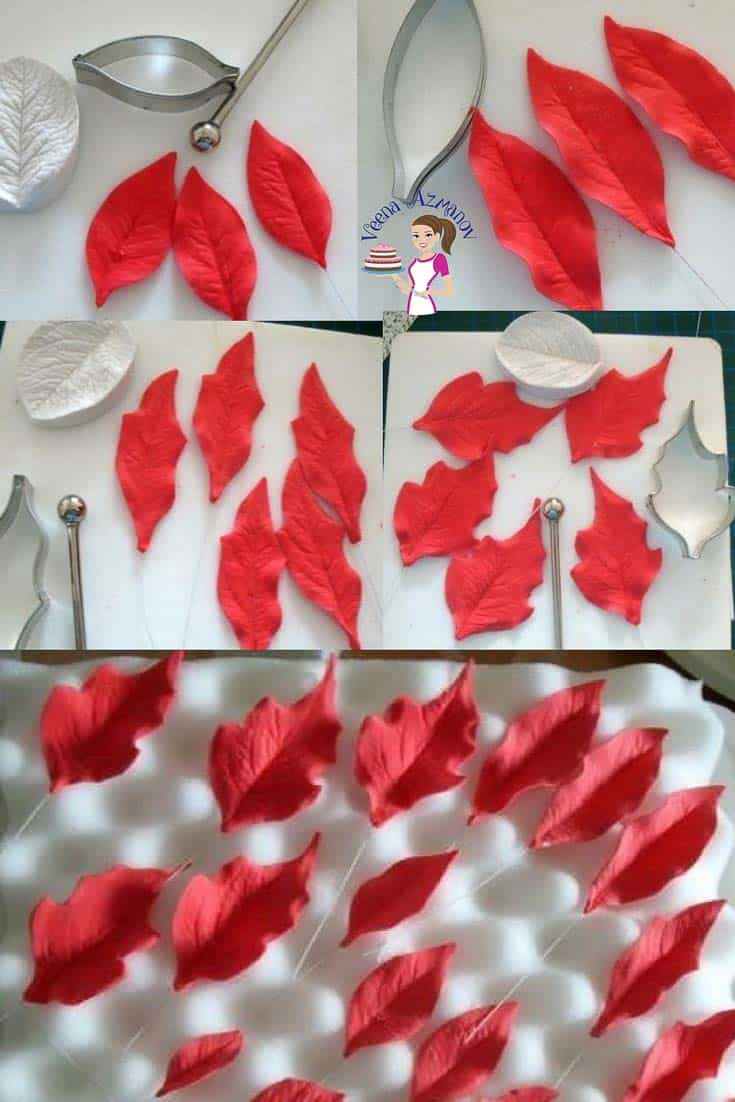
Rolling out the bracts/petals
- I prefer to use my cell board for this.
- Just roll a long sausage.
- Place on the cell board and roll back and forth, keeping the grooves in place.
- You want to roll your paste thin, but not too thin as well. I’d say a little more than 1/8”.
- Remove the paste from the cell board. Flip the paste over. Center the cutter on the paste and cut out as many petals as you can or need.
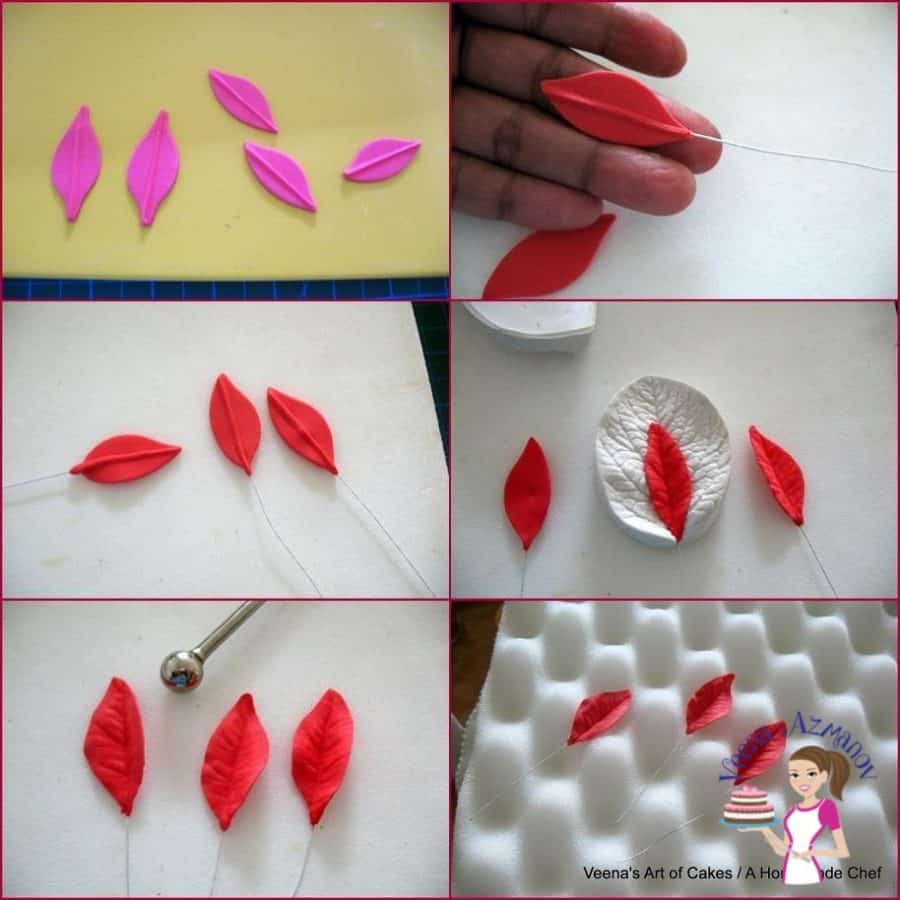
- Hold the bracts in your hand between your thumb and finger. Dip the end of your wire in edible glue. Wipe off excess glue. Slowly thread the wire through the center vein.
- Use the leaf vainer to create veins.
- Thin the edges – This is done by placing the ball tool half on the white soft board and half on the petal and then rubbing the ball tool across the edges of the bract. Place on the foam pad to dry.
- Poinsettia petals are not frilly, so do not over-soften the edges.
You will use this method for all the bracts /petals and leaves used below.
Here I’m showing you the first row – Red
- Using the above method, make three bracts/ petals with the smallest size cutter.
- Hold the bracts in your hand between your thumb and finger. Dip the end of your wire in edible glue. Wipe off excess glue. Slowly thread the wire through the center vein.
- Use the leaf vainer to create veins.
- Thin the edges – This is done by placing the ball tool half on the white soft board and half on the petal and then rubbing the ball tool across the edges of the bract. Place on the foam pad to dry.
- Poinsettia petals are not frilly, so do not over-soften the edges.
Using the same above method. make rows 2, 3, 4, and 5
- Make three bracts /petals of rows 2 and 3.
- Make five bracts/ petals for rows 4 and 5.
- Vein and thin the edges and place them on the foam pad to dry.
Next row – Green or marbled
- Using the same method above, you can make the next row of leaves in green.
- Using the same cutter as the last row made in red.
- Here, I am marbling some red and green to give the flower more character.
- You could do this, or just make the leaves green.

To achieve this marble effect
- Take equal amounts of red and green sugar paste.
- Roll both into sausages. Twist the sausages together. About 3 to 4 times.
- Then, roll it into one sausage. Place on the cell board and roll as before.
- Flip the paste. Center the cutter and cut out five leaves.
- Vein and thin edges are the same, as shown above.
- Place on the foam pad to dry.
The last row – Green.
- Using the same method above. Make 5 or 7 more leaves using the last and largest size leaf cutter.
- Since the cutter is big, I have to do this one leaf at a time on my small cell board.
- Insert the wire and vein, thin the edges, and place them on the form pad to dry.
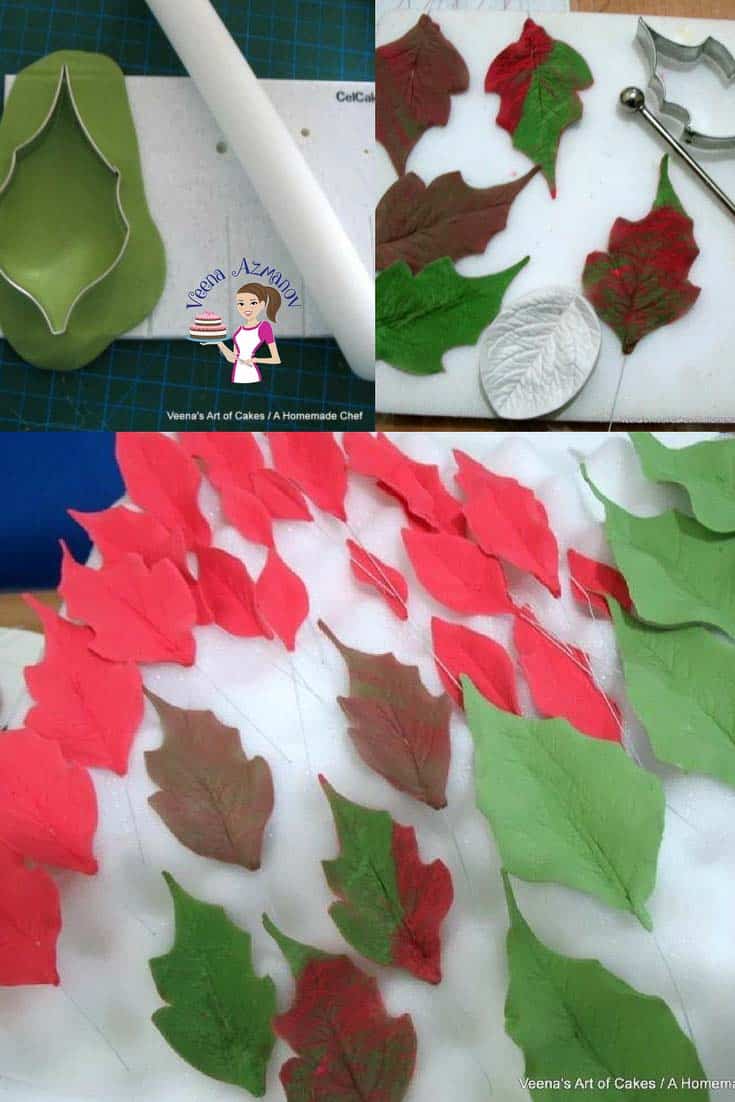
Leave all bracts/petals and leaves to dry completely.
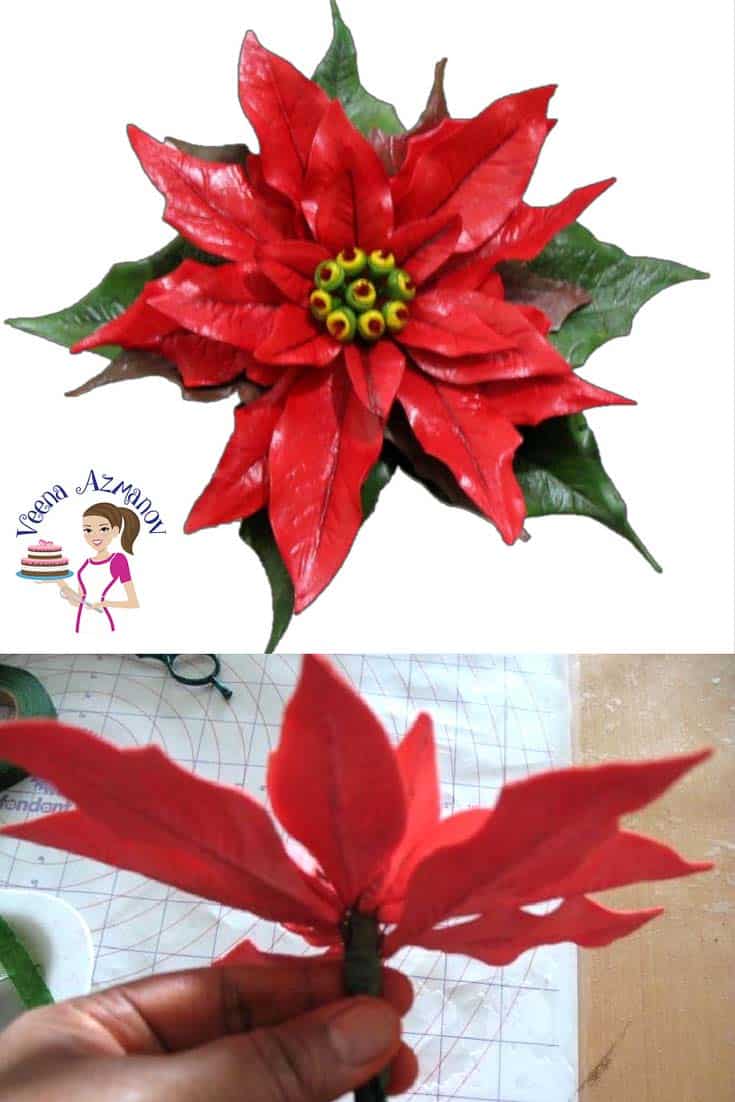
- The poinsettia petals are not cupped in any special way.
- Notice how I have placed them such that they have a natural form that is not too straight nor too cupped.
Don’t forget to save this tutorial on Pinterest for later.
You can find a collection of my tutorials and recipes here on Pinterest
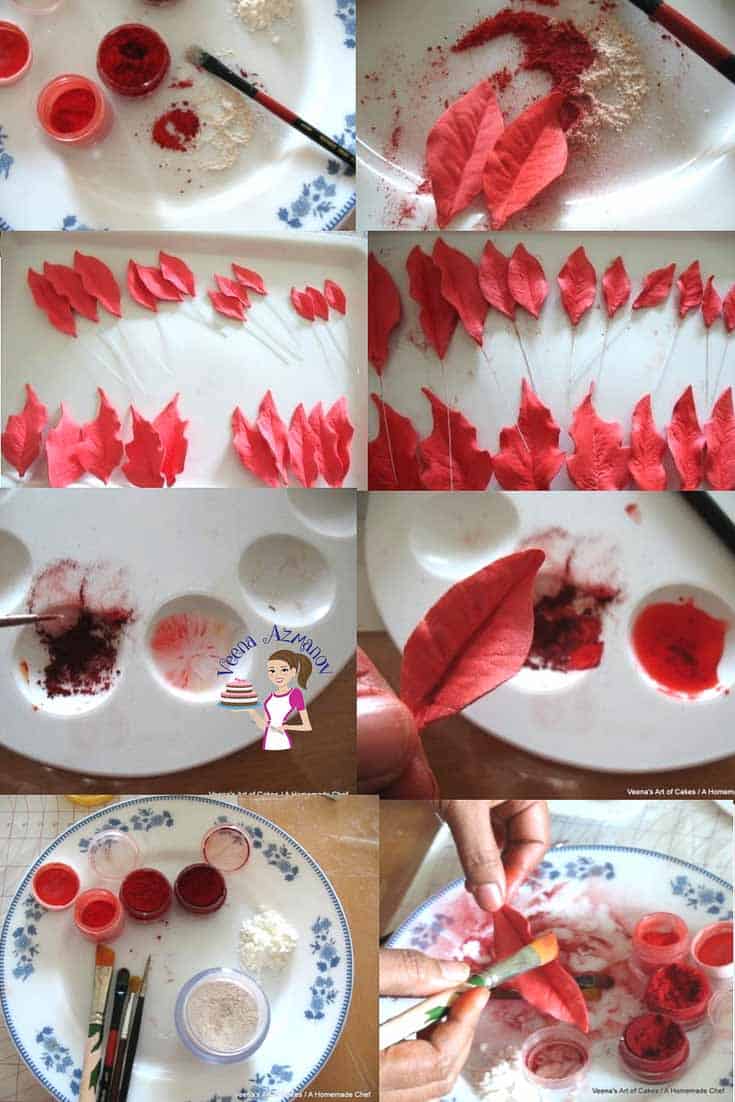
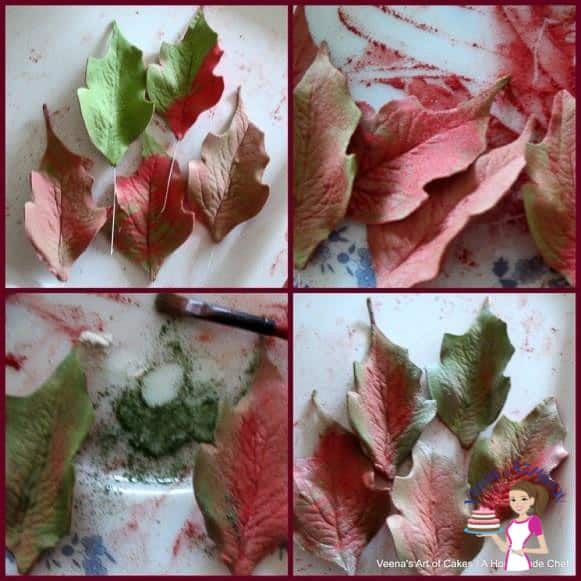
Time to dust the Bracts / Petals (gum paste poinsettia)
Here, I am using Magic Colors
- Deep Red + Dark Red
- (You could use only Poinsettia Red if you have)
- Dash of Maroon or Aubergine. Pearl Luster Dust and
- Corn flour to lighten the colors, I prefer to use soft, flat brushes for my dusting. They are easier to work with and do not break the petals.
Let’s start dusting our gum paste poinsettia
- Mix deep red and a little bit of dark red, or use only Poinsettia Red. Add a dash of Pearl luster dust. Now, dust each and every red petal liberally with these mixed colors from the center outwards. The second row in the collage shows the difference in bracts before and after.
- Take a dash of Maroon or Aubergine color mixed with vodka. Use a thin brush. Now, draw a line highlighting the center vein.
- You can do all the veins, but I prefer to do only the center vein. Leave to dry.
- Re-dust just the center vein again with the above red you used before to dust the whole bracts.
- Very lightly dust the edges of each bract/petal with the dry Dark Red or Maroon. Only the edges.
Dusting the leaves
For the set of marbled leaves
- Dust the whole leaf from the center towards the outer edges with the red/luster mix you used above.
- Then dust the leaf from the outer edges towards the center with moss green and a dash of pearl luster.
(The luster should be barely visible, but it adds a little sheen to all these bracts and leaves.)
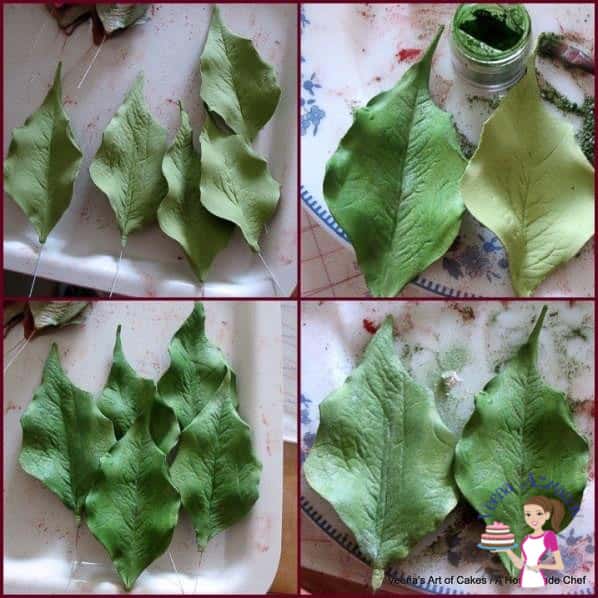
For the Green leaves
- Dust the entire leaf with Moss green petal dust.
- You can see the difference in petals shown before the green and after the green shading.
- Next, dab your brush ever so lightly in luster dust mixed with moss green; re-dust- this time stroking the brush from the outside towards the center.
- The last picture shows the difference before the luster and after.
Assembling the gumpaste poinsettia
- As you did earlier with the centers.
- Cut moss green into two lengthwise pieces and tape each wire, holding the tape at a 45-degree angle. You can do just half the stem, not the full. The other half will be covered with the full tape later.
- Bend each wire at a 45-degree angle to tape it to the flower.
- Using full-width tape for the flower.
- Start with the first petal.
- Bend the wire carefully and start taping.
- It is best to secure each bract with the tape because the end flower is quite bulky.
- Continue to add the petals.
- These can be adjusted later, too.
- The next row of bracts goes between the first row of bracts. So on and so forth.
- Keep the petals close to the centers so they are snug and do not droop down.
- Continue to add more bracts/petals as you go, placing the next between the previous.
- The last two or three rows may become a bit difficult to handle upright.
- The best way to continue to add the rest of the bracts and leaves is to hold the flower upside down.
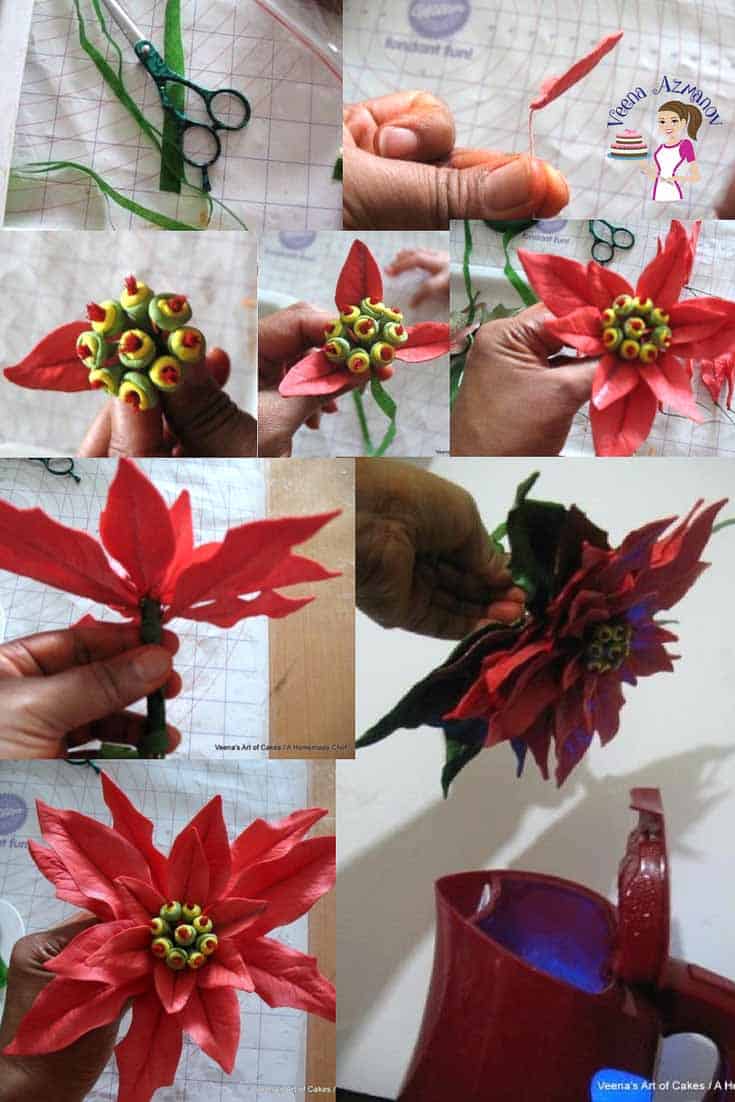
Final touch – Time to steam the gumpaste poinsettia flowers
- This is done by holding the flower over the steam of boiling water.
- Do not hold too close to the steam or for too long, as the petals will melt.
- Each flower takes a few seconds to steam.
- The flower will be very shiny when it is just steamed, but do not touch the bracts/petals or leaves, as it will cause finger impressions.
- This shine will be much less as the flower dries off. The amount of luster you use to dust your flower will determine the shine on your flower.
- If you want a very realistic look to add very little as I have done here. If you want a more fantasy look, add more.
- I find placing the flower over a tall glass helps maintain this big flower.

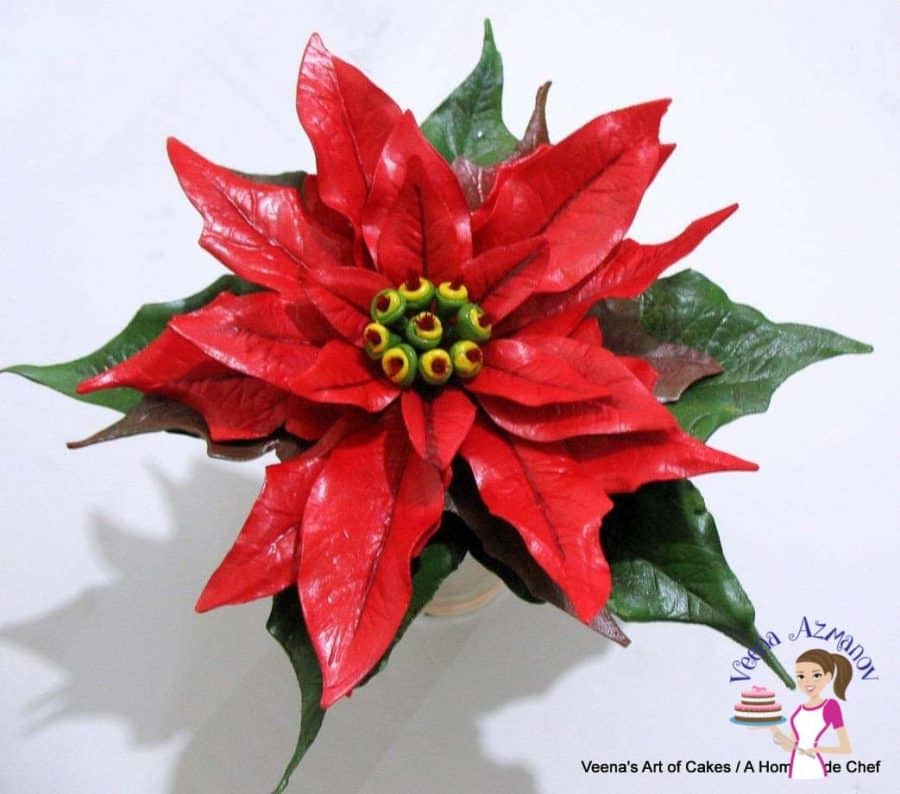
The finished flower – Gum paste poinsettia
Did you enjoy this tutorial? Have you made any flowers using my tutorial? I would love to see them. You can share them with me on my Facebook Page. I love feedback, so if you enjoyed this tutorial or have any questions, I would love to hear your feedback or suggestions in the comments below. Thanks!

Cake Decorating for Beginners – Masterclass


Am a cameroonian
Thanks so much for making me anxious to be a great cook. Am just taking classes on fondant and cakes . I find you site very explicit. Please can you help me with your recipe for, gumpaste and fondant good for all weather
Thank you, Carnie. Happy you like my blog. I have two gumpaste recipes – one for flowers and the other is edible for toppers and such.
As well as six fondant recipes. You should find them all here on this page – Decorate.
Under cake decorating recipes