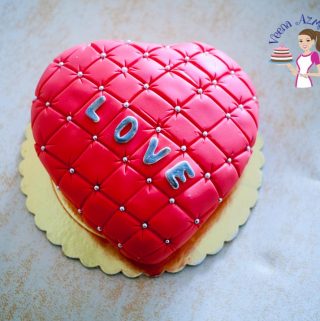
Valentine Heart Pillow Cake Recipe & Tutorial
Calories: 25
Adjust Servings Here: 9 servings
Description
A pillow cake gives that wonderful warm hugs feeling and making it a red heart cake just makes it perfect for Valentine's Day. You will be surprised how easy this cake is to make. Your valentine will think you slaved all day over it.
Ingredients
For the cake
- 1½ cup (190 g) All-purpose flour
- 1 ½ tsp Baking powder
- ½ tsp Salt
- ½ cup (113 g) Unsalted Butter room temperature
- 1 cup (200 g) White sugar
- 2 large Eggs
- 1 tsp Vanilla Extract
- ½ cup (80 ml) Buttermilk
For the frosting
- 1 cup (228 grams) Butter unsalted unsalted
- 4 cups (480 g) Powdered sugar
- 1 tsp Vanilla extract
- 2 -4 tbsp Whipping cream for consistency
Plus
- 1 batch Marshmallow fondant red or your choice of color
Instructions
For the cake
- Preheat the oven to350℉/ 175℃/ Gas mark 4. Grease and line one 7-inch heart cake pan or 8 x 8-inch square pan.
- Sift flour with baking powder and salt.1½ cup All-purpose flour, 1 ½ tsp Baking powder, ½ tsp Salt
- In a separate bowl, cream butter and sugar until light and fluffy. Add eggs one at a time. Followed by the vanilla extract. Lastly, add the flour mixture and buttermilk and combine until smooth.½ cup Unsalted Butter , 1 cup White sugar, 2 large Eggs, 1 tsp Vanilla Extract, ½ cup Buttermilk
- Pour the batter into the prepared baking pan and bake in the preheated oven for 35 to 40 minutes until a skewer inserted in the center comes out clean.
- Cool on a wire rack for 10 minutes before removing from the pan. Always cool cakes completely before you decorate or store cakes awayPro tip - Freeze the cake for an hour (optional) as it makes it easier to carve.
For the frosting
- In a large bowl with the whisk attachment, cream the butter until light and fluffy. Then, add the powdered sugar one cup at a time. Add the salt and vanilla extract followed by the heavy cream. Continue to whip until light and fluffy.1 cup Butter unsalted, 4 cups Powdered sugar, 1 tsp Vanilla extract, 2 -4 tbsp Whipping cream
Pillow / cushion cake
- If you use a square pan – Using the heart template, cut out the heart cake. Hold the knife at a 90% angle – straight up – so you get a nice straight side (not beveled)
- Round the edges and shape the heart, as shown in the video. Make sure to flip the cake over and crave both sides.
- Crumb-coat the cake and let chill for 15 minutes. Make sure to flip the cake over and crave both sides.
- Chill the cake for at least an hour. Then use a cling wrap to smooth the cake as shown in the video
- Roll red color fondant 10 inches larger than the diameter of the cake. Gently roll it over the rolling pin. Then, unroll it over the cake. Use your hands to smooth it out, cutting any excess as necessary.1 batch Marshmallow fondant
- Tuck the fondant under so the edges are raised from the sides. Use a fondant smoother or your hands to smooth the sides and edges.
- Use a fondant lattice tool or the back of a paintbrush to create diagonal lines about an inch apart in one direction. Then, turn the cake over and do the same diagonally in the other direction. Pro tip: Starting from the center works best. Make a line in the center, then continue on one side, then the other. This helps keep them evenly spaced.
- You should now have a square (lattice) pattern on the cake. Use the back of a paintbrush to deepen the same lines. Use the bottom of your paintbrush to make a slight dip at every intersection of the lines.
- Using a tweezer place a dragee at the corner of every square. Dust the cake with luster dust for a smooth shiny finish.
The nutrition information and metric conversion are calculated automatically. I cannot guarantee its accuracy. If this data is important to you please verify with your trusted nutrition calculator. Thank you
Did you make this recipe? Share it with me.Tag @veenaazmanov_kitchen on instagram or #hashtag it #veenaazmanovkitchen