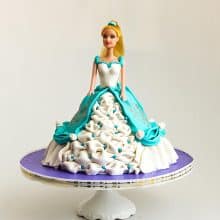
Princess Birthday Cake Tutorial
Calories: 12
Adjust Servings Here: 9 servings
Description
A princess cake makes a perfect birthday cake for any little girl no matter what Disney princess she loves. While it is a sculpted cake it is one of the simplest and easiest cakes to create. Fondant designs with ruffles, frills, swags, and bows are the easiest additions to make a girl's dream dress. The best part is that you can even get the little girl to be part of the making process.
Ingredients
- 1 cake Chocolate Mud Cake Recipe. baked in a doll pan
- 250 grams Velvet American buttercream
- 250 grams Chocolate Ganache
- 700 grams Marshmallow Fondant
- ½ cup Simple syrup
Instructions
Decorate
- Torte the skirt-shaped cake into three layers and brush each layer with simple syrupPro tip - If you plan to use a doll with legs - hollow out the top end of the skirt making space for the doll legs (alternatively you can just use the top half of the doll's body as I have in the video)1 cake Chocolate Mud Cake Recipe., ½ cup Simple syrup
- Stack the cake layers on the cake board - spreading a generous amount of frosting between each layer. Place in the fridge for 15 minutes so the layers do not move.Pro tip- chilling the cake now will prevent the layer from moving during frosting.250 grams Velvet American buttercream
- Frost - Then frost the cake with chocolate ganache or more buttercream - use a spatula to smooth the layers. Chill the cake in the fridge for an hour or more so the ganache sets firm250 grams Chocolate Ganache
- Fondant - Brush the cake lightly with water and wipe off any excess. Roll white fondant and cover the cake smoothing all around and cut off the excess Pro tip - covering the skirt now will prevent the fondant from getting messy with chocolate during decorating.
Skirt Decorations
- Billow ruffles - Roll thin white fondant and cut into 3 x 3-inch squares or 3 x 4-inch rectangular pieces. Pinch the two short sides like an accordion as shown in the video. Arrange each billow on the cake in front of the dress. Continue to make these until you have a tapered design from top to bottom. Add turquoise dragees between each billow ruffle to cover the seams.700 grams Marshmallow Fondant
- Bottom frill - Roll a strip of white fondant about 8 inches long and 4 inches wide. Create wide pleats starting from the center out towards both ends. Use a rolling pin to press the center so everything stays in place. Use a pizza cutter to cut the center lengthways and make two frills as shown in the video. Use a cone shape tool or a toothpick to soften/frill the edges. Place these around the cake on both sides of the billow ruffles.
- Stenciled frock - Roll a piece of fondant about 10 inches long and 4 inches wide. I used turquoise-colored fondant. Place a stencil on top and using a brush dust the stencil with gold luster dust. Remove the stencil. Measure the cake and cut the desired length for the skirt. Gently pick it up and place it on the sides of the dress cake securing it on the top. Pro tip - gently press the stencil on top of the fondant with a rolling pin to ensure the stencil does not move on the fondant. Use a soft clean art brush and a gentle tapping motion.
- Back ruffles - Roll and cut two long strips of turquoise fondant about 6 inches long and 5 inches wide. Fold to create pleats lengthways. Arrange on the back of the dress. Pro tip - create movement with the ruffles so they look natural. Secure the top but make sure to cut off the excess.
- Swag - Again, roll 3 strips of turquoise fondant about 8 inches long and 4 inches wide. Fold the pleats and cut the strip into three to make three swags. Pinch the edges so the pleats stay together. Then, place them on the skirt above the white frills. Pro tip - I placed small white fondant roses to cover the edges as seen in the pictures. You can also add degrees of mini fondant flowers.
Princess Body
- Bodice - Place a small white fondant strip (about 2 inches wide and 4 inches long) over the body. Press into place and cut off the excess at the back. Shape under the arms cutting off excess. Shape the neckline into a U or V shape. Turquoise fondant can be used to create accents like bodice lines and sleeves. Place the body on the skirt making sure to cut off excess. Pro tip - make sure to cut off any excess fondant from the center before you add the body so as to prevent the doll from looking big at the waist.
- Belt - Using white fondant cover the seams at the waist with a thin strip of fondant. Add a bow at the back and you have a belt.Pro tip - I used a textured rolling pin over the fondant before making the belt.
The nutrition information and metric conversion are calculated automatically. I cannot guarantee its accuracy. If this data is important to you please verify with your trusted nutrition calculator. Thank you
Did you make this recipe? Share it with me.Tag @veenaazmanov_kitchen on instagram or #hashtag it #veenaazmanovkitchen