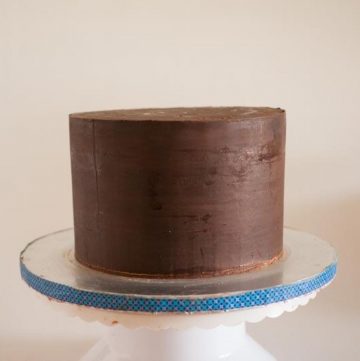
How to Ganache A Cake with Sharp Edges
Calories: 18
Adjust Servings Here: 1 cake
Description
Sharp edges on ganache cakes are now the basics of good cake decorating. Almost all professionally decorated cakes you see have beautiful crisp share edges with perfectly straight sides all around. This video shares how I get sharp edges on my ganache cakes.
Ingredients
- 2 layers Devil’s Food chocolate cake
- 400 grams Velvet American Buttercream or more ganache
- 800 grams Cake Decorators Chocolate Ganache
- ½ cup Simple syrup to moisten cakes
Instructions
- Bake and cool your cakes. I usually make sure I have at least two layers each 2 inches tall so the finished cake is a minimum of 4 inches tall.Pro tip - If you like to trim the caramelization off your cakes make sure to bake more cake or taller layers so you have 2-inch after trimmings. Sometimes I even freeze the cake for half an hour so it's firmer to work with.
- Level the cake layers - cut the domes off the cake using a bread knife or cake leveler
- Torte each layer into two horizontally. Place one cake board on the cake drum with a little ganache to help keep it in place.Pro tip - I like to use a turntable with a non-slip mat. The non-slip mat under my cake drum prevents it from moving around.
- Moisten - Simple syrup each layer with a pastry brush.
- Fill - Add a big dollop of buttercream or ganache on each layer. Spread with a straight-edged spatula.
- Stack - Place the next layer on top followed by more frosting until you have stacked all four layersPro tip - Trim the outside edge if necessary - you can see me do this in my video - This ensures the sides are straight.
- Level - Use a cake leveler to ensure the cake is leveled. You may need to press down on the side that is higher to help shimmy the frosting around. Pro tip - Then use two bench scrapers on either side of the cake to ensure the sides are straight. (just so the layers are not peaking out)
Method 1
- Chill - Place the cake in the fridge for 10 minutes - the frosting will set and the layers won't move when you are frosting the outside.
- Cake top - Place a big dollop of ganache on the top layer. Spread it evenly making sure you have ganache over the edges.
- Cake board - Place a cake board the same size as the bottom board. Use two cake scrapers to make sure the top and bottom boards are aligned together. Chill the cake for 20 minutes.
- Cake sides - Using a spatula frost the sides of the cake with ganache. Make sure to use a paddle motion with the ganache - this prevents air pockets. Use a bench scraper to smooth the sides of the cake.
- Chill - Continue to spread and smooth the ganache until you have smooth sides. Chill the cake for at least 2 hours
- Top board - Use a hot spatula or knife. Place the spatula between the top cake board and the ganache (see video) Pass the spatula under the board until you have loosened the board from the cake.Pro tip - dip the spatula in hot water. Gentle move the spatula - letting the heat from the spatula guide you along. Do not push too hard as the ganache will crack
- Smooth top - The top will be uneven and rough - this is normal. Add just enough ganache to fill and cover the top. Use an offset spatula to smooth the top and use a bench scraper to smooth the sides.Pro tip - Since the cake is chilled well the sides will remain smooth.
- Edge - Once smooth the little ganache that's left over the edges can be taken off with a spatula or knife (see video)
Method 2
- Cake top - Add a large dollop of ganache on top and smooth the top with an offset spatula and bench scraper. Chill the cake for 30 minutes.
- Cake sides - Using a spatula, frost the sides of the cake with ganache. Make sure to use a paddle motion with the ganache. Use a bench scraper to smooth the sides of the cake, leaving a large lip on top of the cake. Pro tip - a paddle motion in the spatula when frosting will prevent air pockets.
- Chill - Continue to spread and smooth the ganache until you have smooth sides. Chill the cake for at least 2 hoursPro tip - as you frost the cake a lot of the frosting will collect on the top edge. Leave it for now - this is called the lip!
- Top edge- Use a hot spatula or knife and trim the top lip/ edge (collected ganache). This will then give you a neat square edge on the cake. Pro tip - dip the spatula in hot water. Do not push too hard as the ganache will crack.
The nutrition information and metric conversion are calculated automatically. I cannot guarantee its accuracy. If this data is important to you please verify with your trusted nutrition calculator. Thank you
Did you make this recipe? Share it with me.Tag @veenaazmanov_kitchen on instagram or #hashtag it #veenaazmanovkitchen